Introduction to metadata
Table of contents
Introduction to metadata
Metadata are data that describe other types of data in the system. Metadata can pertain to video streams (single frames or sequences), audio or even other metadata. Metadata can be any data such as GPS coordinates, heat maps, motion data, bounding boxes, facial recognition, LPR, people counts, and audio level. In this document, the data that the metadata pertains to is referred to as “video”, even though metadata can be about other types of data.
Metadata in Milestone products
In the Milestone XProtect VMS, metadata streams are retrieved from different sources to a recording server through device drivers, and is then made available from the recording server for consumers.
| Sources and consumers | Driver | Description | More information |
|---|---|---|---|
| A hardware device, typically a camera, that can generate metadata. | Model-specific device driver | The device driver receives data from the device and converts received metadata into the ONVIF MetadataStream format. | Supported devices |
| An ONVIF conformant device or service that supports metadata. | ONVIF and ONVIF16 drivers | The ONVIF driver receives RTP packets with a MetadataStream payload and extracts the payload. | ONVIF Driver Documentation |
| A device, device proxy or service that can generate metadata | A device driver implemented using the MIP Driver Framework | Using the MIP Driver Framework, you can create fully featured device drivers, similar to the way you create MIP plug-ins. | Introduction to the MIP Driver Framework |
| A hardware device proxy or service that sends metadata using MIP SDK components | The MIP Driver | A component in the MIP SDK takes care of communication with the MIP driver. Another component makes it easy to write and read ONVIF metadata. | Described in this document. |
| Metadata Search integration | How to supply ONVIF-based metadata to XProtect VMS for the Smart Client Metadata search feature. | Metadata Search integration | |
| Metadata search in Smart Client |
The basic scoping and search functionality in the Search workspace can be extended by Search plug-ins that provide search agents and new search categories. |
MIP Search integration - Building Search agents |
In any case, the recording server stores the metadata stream along with other media streams (audio and video), allowing metadata to be managed and read in the same way as audio and video.
A common exchange format, the ONVIF MetadataStream schema, decouples the producer from the consumer. The consumer does not need to know how or by whom the metadata was produced. This allows a consumer of for example bounding boxes to read metadata provided by cameras and third-party metadata integrations, and allows Milestone to add functionality directly to core products, such as XProtect Smart Client, that can read and display information independent of the producer.
Examples of use
This section describes a few uses of metadata in the XProtect VMS.
- Bounding boxes
- Position data
- Analytics metadata
Bounding boxes
A bounding box is a box that surrounds an interesting feature of the video or image. The “interesting feature” can for example be motion, face recognition, number plate, anomalies, etc.
The bounding boxes are often the result of an automated analysis of the video, and are used to draw attention to an interesting feature that the analysis discovered. One of the simplest forms of usage is to draw bounding boxes around areas in the video where there is motion. Figure 1 shows an example of bounding boxes around areas showing motion.
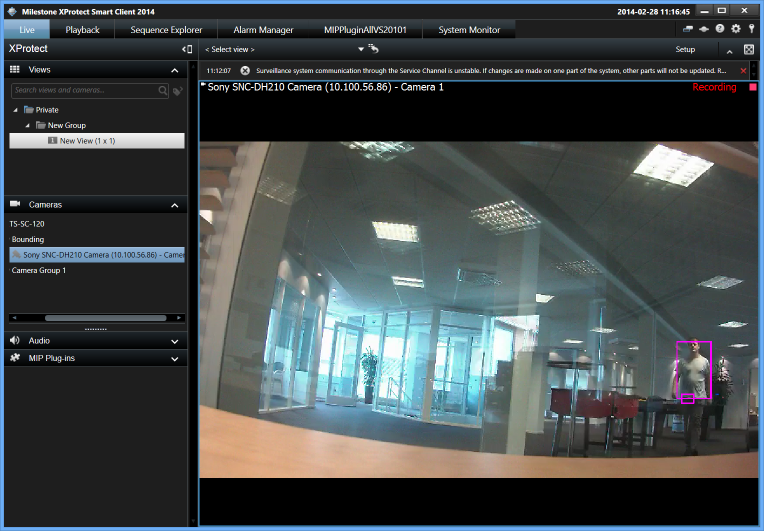
XProtect Smart Client has built-in support for displaying bounding boxes encoded in an ONVIF Metadata stream. The format is described in the section Bounding box
Position data
By storing position data about a video, you can tag frames with the position where the frame was captured. This can be useful for video captured with mobile phones or video captured from vehicles. This data can then be read from the XProtect VMS and can be used to display positions on a map, calculate distances, display speed or heading. The format is described in the section Navigational data
Analytics metadata
Any kind of analytics can be stored as metadata and later retrieved. This allows developers to write plug-ins, standalone applications, or integrations to other systems that read the metadata, using the same methods as for video data. For example, the metadata search feature in Smart Client is implemented as a Smart Client plug-in.
Overview of components
This section gives an overview of how the MIP Driver and MIP SDK components support metadata.
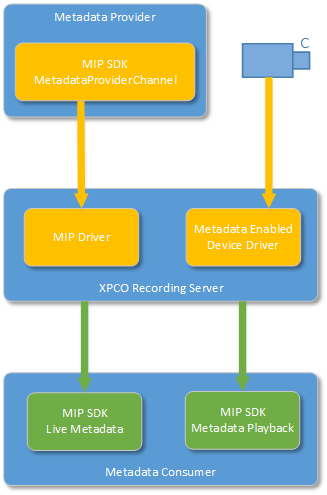
As Figure 2 shows, support for metadata consists of three major parts. These parts mimic video support closely:
- Producers of metadata can be hardware devices (usually cameras), or analytics services that uses the MIP SDK to send data to the XProtect VMS.
- A recording server stores the data (if recording is enabled), passes it on to live consumers, maintains data retention, and runs the drivers.
- The consumers can be stand-alone applications, integration solutions or XProtect Smart Client plug-ins. The XProtect Smart Client supports bounding boxes out-of-the-box.
Providing metadata works in much the same way as when developers want to send video to the XProtect VMS. Reading metadata is also very similar to reading video, both live and playback.
Metadata format
The metadata format is defined by the ONVIF Analytics Service Specification and the ONVIF MetadataStream schema. Milestone has added a few useful extensions which are described in this section.
Frames and RTP packets
The ONVIF Streaming Specification impose no limitation on the size of the MetadataStream XML document, and it can be continuously appended to with new data. However, the XProtect VMS cannot parse the XML document until it is complete and closed. This means that analytic events might get processed too late, and in the case of bounding boxes, not displayed at all. As the data is parsed late, the timestamp of the bounding box will be too far in the past and will be skipped as invalid. Due to this limitation, we recommend closing the MetadataStream XML document as soon as possible, preferably within one RTP packet.
The ONVIF MetadataStream schema allows several tt:Frame elements in the same tt:VideoAnalytics element, and several tt:VideoAnalystics elements within a tt:MetadataStream element. We recommend that you have only one tt:Frame and one tt:VideoAnalytics element per RTP packet sent to the recording server. This makes it easier to find data based on timestamps and to associate metadata with the correct video frames.
Objects and bounding boxes
Figure 3 is a basic example of an ONVIF MetadataStream payload, containing an object with a bounding box.
<?xml version="1.0" encoding="UTF-8"?>
<tt:MetadataStream xmlns:tt="http://www.onvif.org/ver10/schema">
  <tt:VideoAnalytics>
    <tt:Frame UtcTime="2013-10-08T08:40:42.042+02:00">
      <tt:Object ObjectId="1">
        <tt:Appearance>
          <tt:Transformation>
            <tt:Translate x="-1.0" y="-1.0"/>
            <tt:Scale x="0.003125" y="0.00416667"/>
          </tt:Transformation>
          <tt:Shape>
            <tt:BoundingBox left="20.0" top="30.0" right="100.0" bottom="80.0"/>
            <tt:CenterOfGravity x="60.0" y="50.0"/>
          </tt:Shape>
          <tt:Class>
              <tt:ClassCandidate>
              <tt:Type>Animal</tt:Type>
              <tt:Likelihood>0.9</tt:Likelihood>
            </tt:ClassCandidate>
          </tt:Class>
        </tt:Appearance>
        <tt:Behaviour>
          <tt:Idle/>
        </tt:Behaviour>
      </tt:Object>
    </tt:Frame>
  </tt:VideoAnalytics>
  <tt:Extension>
    <OriginalData>U29tZU9yaWdpbmFsRGF0YSBlbmNvZGVkIGluIEJBU0U2NA==</OriginalData>
  </tt:Extension>
</tt:MetadataStream>
A model-specific device driver for a device that support metadata add the extension element OriginalData. This element contains the raw binary metadata data from the device, base64-encoded. Thus, metadata that cannot be represented in the ONVIF MetadataStream schema can be retrieved from the OriginalData element.
ClassCandidate types
An object can be associated with several candidate types that describes the object. ONVIF MetadataStream offers a predefined set of types but also allows for extending this with other types.
<tt:Class>
  <tt:ClassCandidate>
    <tt:Type>LicensePlate</tt:Type>
    <tt:Likelihood>0.6</tt:Likelihood>
  </tt:ClassCandidate>
  <tt:ClassCandidate>
    <tt:Type>Other</tt:Type>
    <tt:Likelihood>0.3</tt:Likelihood>
  </tt:ClassCandidate>
  <tt:Extension>
    <tt:OtherTypes>
      <tt:Type>Phonenumber</tt:Type>
      <tt:Likelihood>0.3</tt:Likelihood>
    </tt:OtherTypes>
  </tt:Extension>
</tt:Class>
tt:ClassCandidate type and an extension tt:ClassCandidate type.The MIP class VideoOS.Platform.Metadata does not support the Extension and OtherTypes elements, and instead allows an arbitrary set of ClassCandidates, even if the type is not one of the predefined types. This has two implications:
- Reading
- When reading data generated using
VideoOS.Platform.Metadata, an application should be aware that thett:ClassCandidatecollection can contain types not in the predefined set of allowed values, and any candidates in thett:Extensionelement will be ignored. - Writing
- When writing data using
VideoOS.Platform.Metadata, be aware that it does not validatett:ClassCandidate/tt:Type.
Figure 5 shows an example of the XML output produced using VideoOS.Platform.Metadata.
<tt:Class>
  <tt:ClassCandidate>
    <tt:Type>LicensePlate</tt:Type>
    <tt:Likelihood>0.4</tt:Likelihood>
  </tt:ClassCandidate>
  <tt:ClassCandidate>
    <tt:Type>Phonenumber</tt:Type> <!-- Not an ONVIF tt:ClassType -->
    <tt:Likelihood>0.3</tt:Likelihood>
  </tt:ClassCandidate>
  <tt:ClassCandidate>
    <tt:Type>Price</tt:Type> <!-- Not an ONVIF tt:ClassType -->
    <tt:Likelihood>0.1</tt:Likelihood>
  </tt:ClassCandidate>
  <tt:ClassCandidate>
    <tt:Type>Other</tt:Type>
    <tt:Likelihood>0.1</tt:Likelihood>
  </tt:ClassCandidate>
</tt:Class>
VideoOS.Platform.Metadata example output with multiple tt:ClassCandidate nodes, where two of them are not valid ONVIF tt:ClassType.Bounding box and descriptive text extensions
To allow developers to control the presentation of bounding boxes and to add descriptive text to objects, Milestone has extended the ONVIF MetadataStream schema with a few optional elements, BoundingBoxAppearanceand Description:
<tt:Appearance>
  <tt:Shape>
    <tt:BoundingBox bottom="0.25" top="0.75" right="0.55" left="0.05" />
    <tt:CenterOfGravity x="0" y="0" />
    <tt:Extension>
      <BoundingBoxAppearance>
        <Fill color="#BBF5F5DC" />
        <Line color="#44808080" displayedThicknessInPixels="4" />
      </BoundingBoxAppearance>
    </tt:Extension>
  </tt:Shape>
  <tt:Extension>
    <Description x="0.3" y="0.8" size="0.05" bold="true" italic="true" fontFamily="Helvetica" color="#44808080">A square</Description>
  </tt:Extension>
</tt:Appearance>
BoundingBoxAppearance and Description extensions for objects.- All colors are represented using a hexadecimal ARGB string, starting with a '#' character. '#00000000' (completely black) and '#80FFFF00' (semi-transparent yellow) are examples of valid colors. #000000 (black without alpha value) is an invalid color.
- The thickness of the line is set in pixels and is absolute.
- All values for the bounding box layout are optional, so you can choose to set one, two, or all three of them.
- All attributes for the description are also optional.
- The x and y-coordinate are the center of the text. If both or one of them are not present, XProtect Smart Client finds a place to put the text. The coordinates are relative and scaled just as coordinates for the bounding box itself via the
TranslateandScaleelements. - The default value for the
boldanditalicattributes is false. - The
sizeattribute denotes the height of the letters in the text. It is relative and scaled just as any other y-coordinate. The resulting value is a normalized height between 0 and 2. The normalized ONVIF coordinate system has a y-axis in the range -1 to 1, so a height of 2 is a text with letters with the same height as the image. A normalized size value of 0.1 is a text where the letters have a height of 5% of the image. If a height is not set, XProtect Smart Client sets a suitable height. - The
fontFamilyattribute is a text describing the font. If XProtect Smart Client cannot access this font family, it uses a default system font.
In the MIP SDK, the tt:BoundingBoxAppearance element is represented by VideoOS.Platform.Metadata.Rectangle, and the Description element by VideoOS.Platform.Metadata.DisplayText.
Navigational data
Navigational data related to the metadata stream source (i.e. the hardware device) is not available in the ONVIF MetadataStream schema. XProtect supports navigational data related to the metadata stream through an extension to the ONVIF MetadataStream schema. You can see an example of this format in Figure 8 and you will find the various elements described in Table 1. The NavigationalData element relates to all frames within the tt:MetadataStream root element.
<?xml version="1.0" encoding="UTF-8"?>
<tt:MetadataStream xmlns:tt="http://www.onvif.org/ver10/schema">
  <tt:VideoAnalytics>
    <tt:Frame UtcTime="2013-10-08T08:40:42.042+02:00">
  </tt:VideoAnalytics>
  <tt:Extension>
    <NavigationalData version="1.0">
      <Latitude>52.069926</Latitude>
      <Longitude>11.796875</Longitude>
      <Altitude>45.6</Altitude>
      <Azimuth>152.0</Azimuth>
      <HorizontalAccuracy>6.5</HorizontalAccuracy>
      <VerticalAccuracy>6.5</VerticalAccuracy>
      <Speed>36</Speed>
      <GeodeticSystem>WGS84</GeodeticSystem>
    </NavigationalData>
  <tt:Extension>
</tt:MetadataStream>
NavigationalData.If the NavigationalData element is absent, it means that the location service has not been turned on at all. If an empty NavigationalData is present, it means that a location service was enabled, but that no data was available. This can for example happen if a GPS lock has not been acquired and there are no other location services available. All child elements are optional.
| Element | Description |
|---|---|
NavigationalData |
This is the container element for all the navigational data. It is located directly inside the MetadataStream's Extension element. |
Latitude |
In degrees. A double from -90 to +90 |
Longitude |
In degrees. A double from -180 to +180 |
Altitude |
Measured in meters. A double |
Azimuth |
Aka bearing or course, this is the device angle to true North. Measured in degrees with a double from -180 to +180 |
HorizontalAccuracy |
Horizontal accuracy measured in meters. A positive double |
VerticalAccuracy |
Vertical accuracy measured in meters. A positive double |
Speed |
The speed of the device. A non-negative double. |
GeodeticSystem |
Defines how to interpret the coordinates and altitude. If not present, a value of WGS84 is assumed. |
The Milestone MetadataStream classes
The class VideoOS.Platform.Metadata.MetadataStream supports reading and writing an ONVIF MetadataStream payload.
A number of related classed make it easy to access a subset of the elements in the MetadataStream schema. These classes – shown in Figure 9 – are also used internally in Milestone.
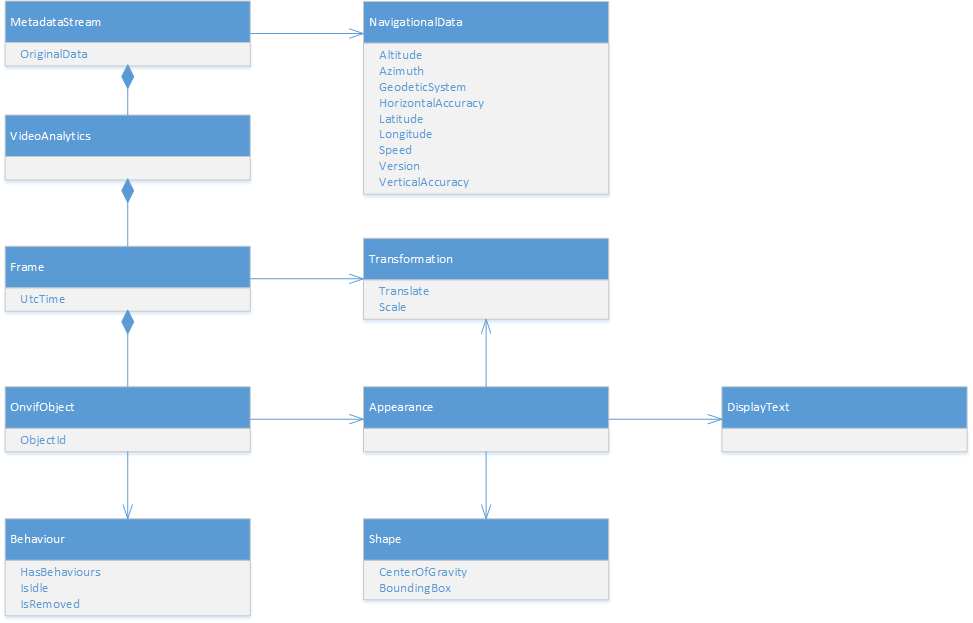
VideoOS.Platform.Metadata classes. A few minor classes have been omitted.You can, of course, create and parse the MetadataStream payload any way you see fit.
Detailed component breakdown
This section provides a detailed description of how to write ONVIF metadata to the XProtect VMS using the MIP Driver, and how to read a metadata stream, either live or recorded.
Writing metadata
To write metadata to an XProtect VMS, two things must be in place:
- An application that acts as the hardware device.
- An instance of the MIP driver that communicates with the application.
Developing an application to send metadata
Code snippets in this section are from the GPS Metadata Provider sample.
The first step is to write the actual application that sends metadata to the XProtect VMS, using the MediaProviderService class and its methods.
An example of how to do this for a device that will only send GPS metadata is shown in Figure 10.
As the code example indicates, the first step is to create a description of the pseudo-hardware. This is the responsibility of the HardwareDefinition class. This class takes two required parameters in the constructor: A name for the device, and a MAC address. This MAC address is not related to the host where the application runs; it is used as an identifier for the device. After this, a single metadata device is configured by using a convenience method to configure a device that delivers GPS data. With this definition in hand, it is now possible to create an instance of MediaProviderService. The Init method takes a port number where the instance accepts connections from the MIP Driver, a password used when adding hardware, and the definition of the hardware.
var hardwareDefinition = new HardwareDefinition(
    PhysicalAddress.Parse("001122334455"),
    "MetadataProvider")
{
    Firmware = "v10",
    MetadataDevices = { MetadataDeviceDefintion.CreateGpsDevice() }
};

var metadataProviderService = new MediaProviderService();
metadataProviderService.Init(52123, "password", hardwareDefinition);

// Create a provider to handle channel 1
var metadataProviderChannel = _metadataProviderService.CreateMetadataProvider(1);
metadataProviderChannel.SessionOpening += MetadataProviderSessionOpening;
metadataProviderChannel.SessionClosed += MetadataProviderSessionClosed;
After the call to the Init method, you can now add the device to the XProtect VMS by using the supplied port number and password. When the hardware has been added, it looks like Figure 10
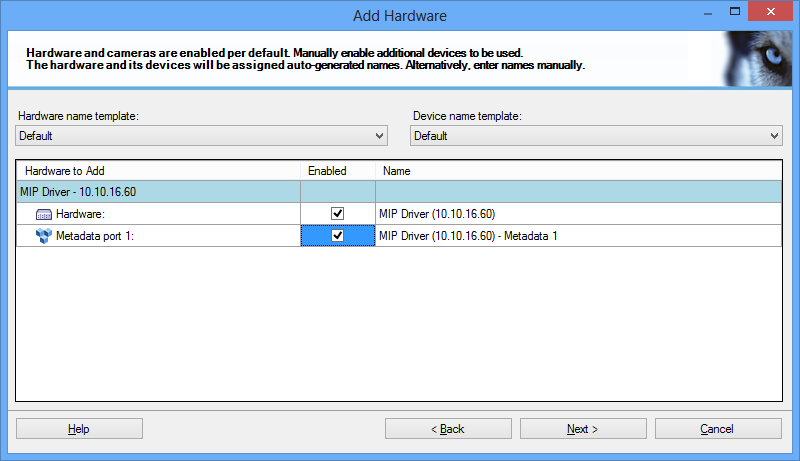
When you have called the Init method, the next step is to create a channel where data can be sent. It does not matter whether you create this channel before or after the hardware is added to the XProtect VMS. Provide the correct channel number when creating a channel, in this case 1. If there are multiple devices defined in the hardware definition, it is up to the client of the SDK to keep track of which channel corresponds to which metadata device.
The channel has a couple of events that provide information on whether a driver has established a session to the application or not. There can be several sessions open simultaneously. The last step is to send data to the XProtect VMS as shown in Figure 12.
var metadata = new MetadataStream
{
    NavigationalData = new NavigationalData
    {
        Altitude = 12.376815,
        Latitude = 55.656797,
        Longitude = 12.376815
    }
};

var result = metadataProviderChannel.QueueMetadata(metadata, DateTime.UtcNow);
if (result == false)
    // Handle not being able to send data
First, we create the metadata – in this case the GPS coordinates of the Milestone headquarters – and then transmit them to the XProtect VMS by using the QueueMetadata method with the timestamp of the metadata. This returns true if the data was successfully queued (but not sent!). If the queue is full, meaning that there are no consumers in the other end, the method returns false. That’s how simple it is to send metadata to the XProtect VMS.
A bit more complicated is the case where the pseudo-hardware needs to push both video and metadata at the same time, which is shown in Figure 13.
var hardwareDefinition = new HardwareDefinition(
    PhysicalAddress.Parse("001122334455"),
    "VideoAndMetadataProvider")
{
    Firmware = "v10",
    CameraDevices =
    {
        new CameraDeviceDefinition
        {
            Codec = MediaContent.Jpeg,
            CodecSet = { MediaContent.Jpeg },
            Fps = 8,
            FpsRange = new Tuple<double, double>(1, 30),
            Quality = 75,
            QualityRange = new Tuple<int, int>(1, 100),
            Resolution = "800x600",
            ResolutionSet = { "320x240", "640x480", "800x600", "1024x768" }
        }
    },
    MetadataDevices = { MetadataDeviceDefintion.CreateGpsDevice() }
};

// Open the service
var mediaProviderService = new MediaProviderService();
mediaProviderService.Init(52123, "password", hardwareDefinition);
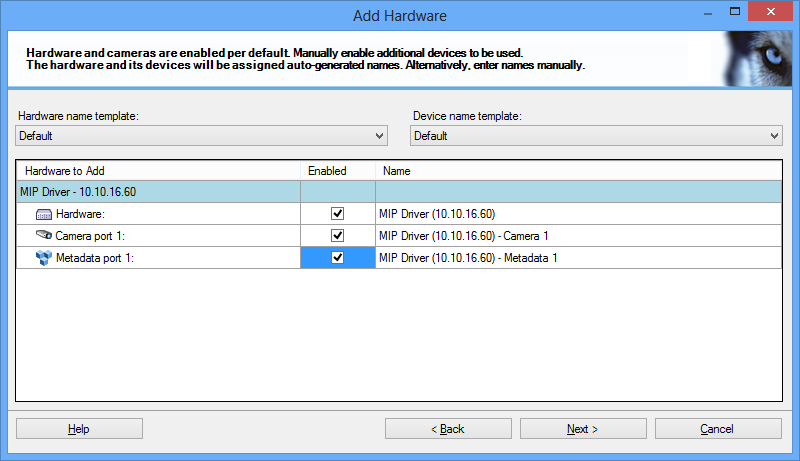
When you add a MIP driver and point it to the correct host and port, a new device with both a camera port and metadata port appears, as Figure 14 shows. You can then send both video and metadata to this device. This is done by using the CreateMediaProvider and CreateMetadataProvider methods respectively.
Defining hardware
When you define the structure of the hardware, a number of classes can help. The entire configuration is built as a tree with an instance of HardwareDefinition as the root. Figure 14 shows the tree-like class structure and all the classes involved. A camera device is configured by using a single class, but it requires several classes to describe a metadata device. A metadata device has at least one type (for example BoundingBox or GPS), which in turn has some capabilities. The capabilities are descriptions of the parameters that you can use to configure each type.
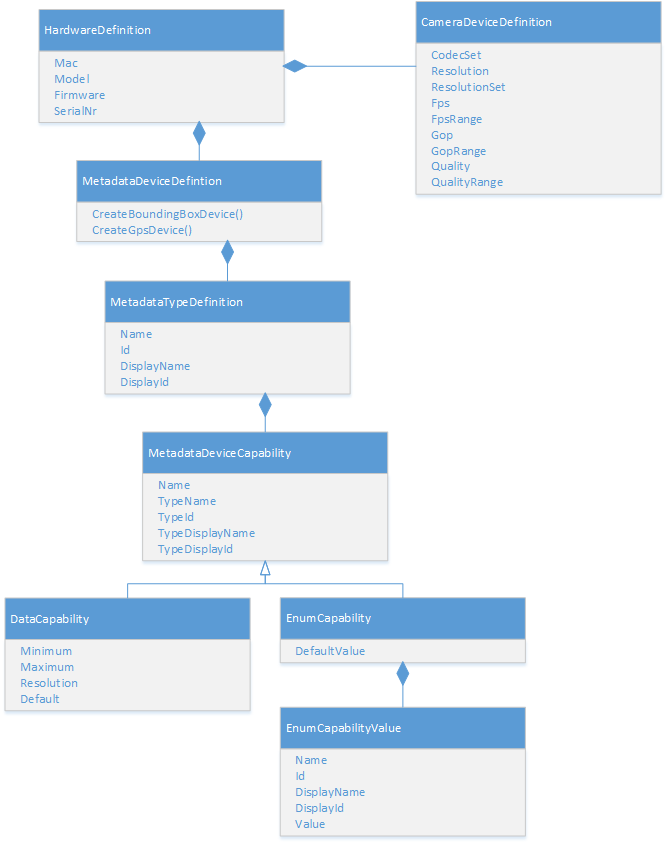
There are two types of capabilities: DataCapability and EnumCapability. The former allows you to use integer parameters for the metadata type, whereas the latter allows you to choose a value from a fixed set, such as “Red”, “Green” or “Blue”.
The capabilities and their settings are managed in XProtect Management Client and transferred back to the client application. This allows the application to read the settings and change its behaviour accordingly.
For a few common metadata types, there are methods that will create the entire hierarchy:
CreateBoundingBoxDevice()CreateGpsDevice()
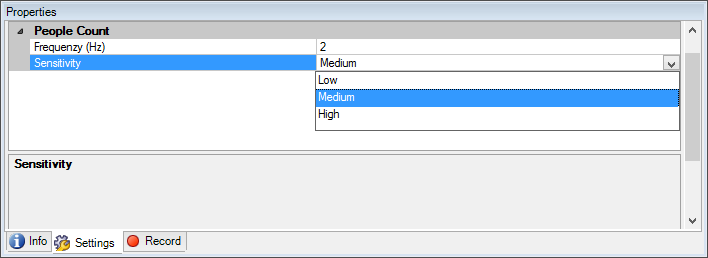
If you choose to define your own metadata types and configuration options, Figure 16 shows an example of how to define a metadata type called People Count
. This metadata type has two configuration options, where the first is frequency that takes on an integer value, and an enumerated option called sensitivity that has three possible values. When this device is added to the XProtect VMS, the XProtect Management Client shows the options displayed in Figure 17.
var hardwareDefinition = new HardwareDefinition(
    PhysicalAddress.Parse("001122334455"),
    "MetadataProvider")
{
    Firmware = "v10",
    MetadataDevices =
    {
        new MetadataDeviceDefintion
        {
            MetadataTypes =
            {
                new MetadataTypeDefinition
                {
                    Name = "PEOPLE_COUNT",
                    DisplayName = "People Count",
                    Id = new Guid("531EF2C1-87FC-4019-9B02-F37D9A1803FE"),
                    DisplayId = new Guid("E3B1D126-5459-44C4-9178-CD4FF785429D"),
                    Capabilities =
                    {
                        new DataCapability
                        {
                            Name = "Frequency",
                            TypeName = "FrequencyType",
                            TypeDisplayName = "Frequency (Hz)",
                            TypeDisplayId = new Guid("CC0BAA51-E5D1-481F-9CAE-B454C9723969"),
                            TypeId = new Guid("3E56D4CF-606C-4F4A-A33E-A888A1343EEA"),
                            Minimum = 1,
                            Maximum = 10,
                            Default = 2,
                            Resolution = 1
                        },
                        new EnumCapability
                        {
                            Name = "Sensitivity",
                            TypeName = "SensitivityType",
                            TypeDisplayName = "Sensitivity",
                            TypeDisplayId = new Guid("FBA4AB76-D3F5-4DE8-870C-AA3C621B5033"),
                            TypeId = new Guid("FBA4AB76-D3F5-4DE8-870C-AA3C621B5033"),
                            DefaultValue = "Medium",
                            EnumValues =
                            {
                                new EnumCapabilityValue
                                {
                                    Name = "Low",
                                    DisplayName = "Low",
                                    Id = new Guid("2D3AAC2E-E108-4C8F-8997-2AB0629B763F"),
                                    DisplayId = new Guid("8274B1A9-B126-4BD8-A74F-C55EEFE323B8"),
                                    Value = "1"
                                },
                                new EnumCapabilityValue
                                {
                                    Name = "Medium",
                                    DisplayName = "Medium",
                                    Id = new Guid("8F9B8D55-2557-493D-9A25-D524580E8F8C"),
                                    DisplayId = new Guid("A8B5A5DB-D606-4590-9CA2-CABEB10FC674"),
                                    Value = "2"
                                },
                                new EnumCapabilityValue
                                {
                                    Name = "High",
                                    DisplayName = "High",
                                    Id = new Guid("D4669253-CBE1-400B-8E2C-DA188C307380"),
                                    DisplayId = new Guid("D4669253-CBE1-400B-8E2C-DA188C307380"),
                                    Value = "3"
                                }
                            }
                        }
                    }
                }
            }
        }
    }
};
When defining the hardware, you need to set a number of GUIDs and names. The GUIDs serve two purposes: One is for localization, and the other is for grouping. All the GUIDs that contain "Display" in their property name are used for localization purposes, whereas the others are used for grouping. This means that for example MetadataTypeDefinition.Id uniquely defines the type of metadata. If developers wants to have for example "People Count" to be the same type for different devices, they must use the same GUID for the type definition so that they can be grouped. If localization is not relevant, any GUID will do. The same goes for groupings: If it does not matter whether the types are the same, any GUID can be used.
In general, please contact support to get new GUIDs and names for new types. If you just want to experiment, you can use your own GUID values, names, and display names. However, if you deploy software with your own names and GUIDs, localized display names are not available.
Reading metadata
Reading back metadata works in exactly the same way as for images and sound. The only difference is that instead of getting media data back, it is metadata that is returned. It is up to the consumer of the data to decide whether the metadata will be returned as a string or de-serialized into the Milestone ONVIF object structure.
Live
Code snippets in this section are from the Metadata Live Viewer sample.
Getting live data is as simple as creating an instance of the class MetadataLiveSource, passing it an instance of an item representing a metadata device in the constructor, and assigning the methods that will handle events. Events are executed on a background thread, and the client must marshal things back to the UI thread if necessary. The code needed to set up and start receiving live metadata is shown in Figure 18.
var metadataLiveSource = new MetadataLiveSource(item);
try
{
    metadataLiveSource.LiveModeStart = true;
    metadataLiveSource.Init();
    metadataLiveSource.LiveContentEvent += OnLiveContentEvent;
    metadataLiveSource.LiveStatusEvent += OnLiveStatusEvent;
    metadataLiveSource.ErrorEvent += OnErrorEvent;
}
catch (Exception ex)
{
    // Init failed
    Debug.WriteLine(ex);
}
As you can see in Figure 18, there are three event handlers that need to be set up: one to handle metadata, one to handle errors and one to handle state changes. The signatures of these methods are shown in Figure 19.
private void OnErrorEvent(MetadataLiveSource sender, Exception exception)
{
    // Logic to handle error events here.
}

void OnLiveContentEvent(MetadataLiveSource sender, MetadataLiveContent e)
{
    // Logic to handle metadata here. Switch to UI thread if needed
    if (e.Content != null)
    {
        // Get the received metadata. Choose one of the two options.
        string metadataXml = e.Content.GetMetadataString();
        MetadataStream metadataObjects = e.Content.GetMetadataStream();

        // Handle metadata
    }
}

void OnLiveStatusEvent(object sender, LiveStatusEventArgs args)
{
    // Logic to handle changes to state here
}
When an event is triggered with live content, there are two ways to extract the data:
Calling
GetMetadataString()on theContentproperty of the event data, a simple string is returned.Calling
GetMetadataStream(), the data is parsed into aMetadataStreamclass and its children. An exception is thrown if the data for some reason cannot be parsed by theMetadataStreamclass.
Clients should choose one of the two options to get data depending on what fits their data and goals best.
Playback
The code snippet in this section is from the Metadata Playback Viewer sample.
It is even simpler to get recorded data because there are no events involved. All that clients need to do is to instantiate an instance of the MetadataPlaybackSource class by using the metadata item as a constructor parameter as shown in Figure 20.
var metadataSource = new MetadataPlaybackSource(item);
try
{
    metadataSource.Init();
}
catch (Exception ex)
{
    // Error initiating the source
    Debug.WriteLine(ex);
}

// Start getting data
When the source has been successfully initialized, you can read data by using the many variants of the Get… methods. The interface is very simple; the MetadataPlaybackSource source acts like other kinds of media players. That is, it has state of where it is in the recording and it can go backwards, forwards and jump to other places in the recording.
As in live mode, it is possible to get the metadata as a string or deserialized into a MetadataStream instance. Handling data errors when doing playback is different from live mode, however, as there are no events. Instead, all the Get… methods can throw exceptions if data cannot be read. These exceptions should be handled in the client code.
Relevant samples
Component integration
- Bounding Box Metadata Provider: MIP Driver, writing metadata. Shows how a metadata device can provide bounding boxes.
- GPS Metadata Provider: MIP Driver, writing metadata. Shows how a metadata device can provide GPS metadata.
- Camera and Metadata Provider: MIP Driver, writing metadata. Shows how a device can provide both a video and a metadata channel
- Multi Channel Metadata Provider: MIP Driver, writing metadata. Shows how one hardware device can provide metadata through multiple channels.
- Metadata Live Viewer: MIP Driver, reading metadata. Shows how to receive live metadata from a device.
- Metadata Playback Viewer: MIP Driver, reading metadata. Shows how to receive recorded metadata from a device.
Plug-in integration
- Demo Driver: Shows how to create a device driver using the MIP Driver Framework
- Smart Client Location View: Demonstrates how to read metadata with location information and show the information in a map in the Smart Client. In this sample, the class
VideoOS.Platform.Data.MetadataSupplieris used to provide metadata and notify the UI when new location metadata is available, both in live mode and playback mode.
References
You can find the network protocols for ONVIF conformant devices at ONVIF Network Interface Specifications.