MIP Search integration
Building Search agents
About this guide
The XProtect Smart Client already offers several ways of searching recordings from the Playback workspace, the Sequence Explorer workspace, and the LPR workspace. The 2019 R2 release added a dedicated Search workspace and MIP SDK support for creating new search functionality. The basic scoping and search functionality in the Search workspace can be extended by Search plug-ins that provide new search categories in addition to the basic search categories (bookmarks and smart motion search).
A Search plug-in provides one or more Search agents and optional customization of the Search workspace user interface. Each Search agent implements a custom search algorithm and new search filters that allow the user to search recordings using the new search category.
This guide provides a general description of Search agents and guidelines for implementing Search agents. The guide is targeted at software developers and Milestone Technology Partners.
Overview
Vocabulary
A MIP Search Plug-in (or just Search Plug-in) is a pluggable .NET assembly that extends XProtect Smart Client’s search functionality in the Search workspace. A Search Plug-in contains Search agents, UI controls and Toolbar actions.
A Search agent is a class that performs search for video recordings. A MIP plug-in can contain several Search agents.
A Search category is a set of filters. It is used to narrow the search for a particular category of results. Some examples of categories are “People”, “Vehicles”, and “Environment”.
A Search filter is a condition clause, specific to the parent Search category, that provides filtering of video recordings. Example of the filters for the “People”-category could be “Age”, “Gender”, “Weight”, etc.
Search criteria defines a search with the time interval, the camera selection, and the Search filters that you set up for a search. When the search is executed, it will return recordings that satisfy the criteria.
Prerequisites
Some familiarity with the MIP SDK, Microsoft Visual Studio and C# is assumed.
To build and run the Search agent sample included in the MIP SDK, you need Visual Studio 2019, or 2022, and XProtect VMS and MIP SDK release 2019 R2 or later.
For XProtect VMS 2022 R3 or later, support for Search plug-ins requires an XProtect Express+, XProtect Professional+, XProtect Expert or XProtect Corporate license. For earlier versions, support for Search plug-ins requires an XProtect Expert or XProtect Corporate license.
Refer to Sample Search agents for more details about how to locate and build the Search agent sample included in the MIP SDK.
In the Smart Client 2019 R2, the Search workspace is hidden by default. To display the Search workspace, you need to add a registry key HKEY_CURRENT_USER\Software\Milestone\Surveillance\SmartClient. You can use this registry script:
Windows Registry Editor Version 5.00
[HKEY_CURRENT_USER\Software\Milestone\Surveillance\SmartClient]
"EnableSearch"=dword:00000001
Getting started with Search Agents
To create a Search agent, you should create a MIP plug-in that uses the MIP SDK Search API. The following sections will describe this API in more detail, including the classes involved and guidelines on how to implement a Search agent.
|
Note: Although it is possible to create a new instance of a |
Basics of the Search workspace
The Smart Client’s Search workspace is divided into following areas:
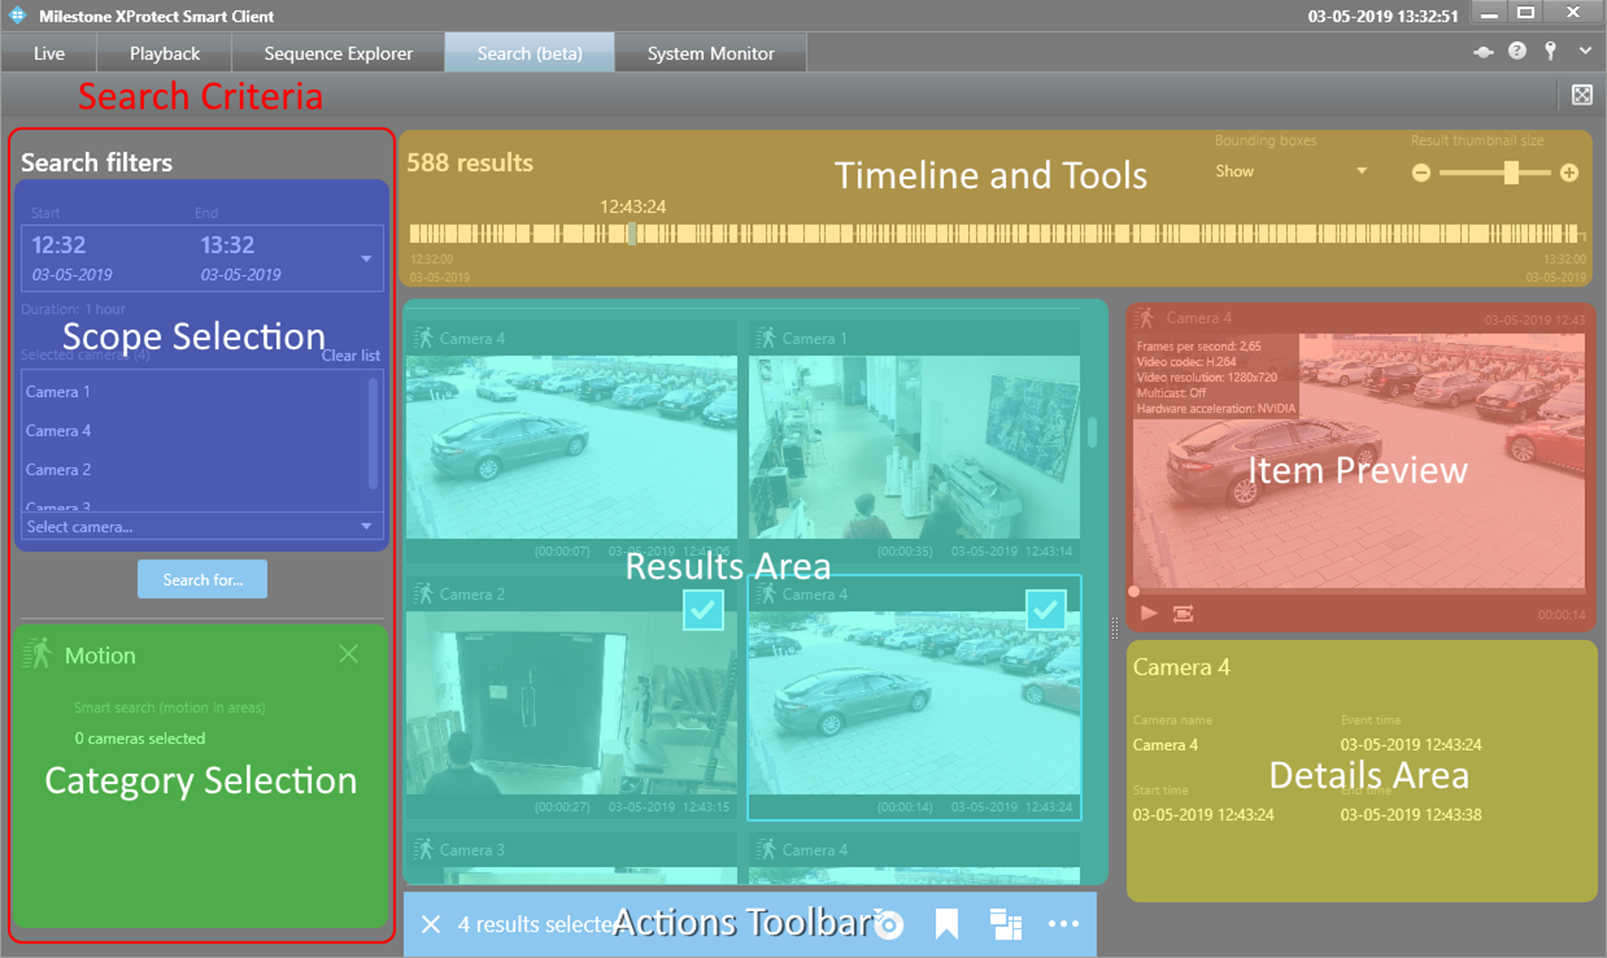
When searching for video recordings, the user sets a scope for the search, which includes time and cameras selection. This will produce search results into the Results Area. The user can then select Categories in order to include search filters. Search filters are used to further refine the search results.
When selecting an item in the Results Area, the user can preview the video recording in the Item Preview area and see further details for the result item in the Details Area.
A MIP Search plug-in can customize:
• The Category Selection Area: by adding new search categories, customizing the search filters input controls, etc. For more information, refer to the Search Definition section below.
• The Results Area: Search agents can produce search results that are displayed in this area. A Search plug-in can customize the appearance of search results.
• The Actions Toolbar: part of the Results Area. Search agents can add custom commands into the Actions toolbar. For more information, refer to the Adding Custom Actions section below.
• The Details Area: Search agents can attach extra data to the search result items. The Smart Client displays the extra data in the Details Area.
Search Agent parts
As any other MIP plug-in, a MIP Search plug-in resides in a .NET assembly. The Search plug-in assembly can contain several Search agents, and optionally include user controls used to customize filter input controls and search results.
The diagram below gives an overview of the types involved:
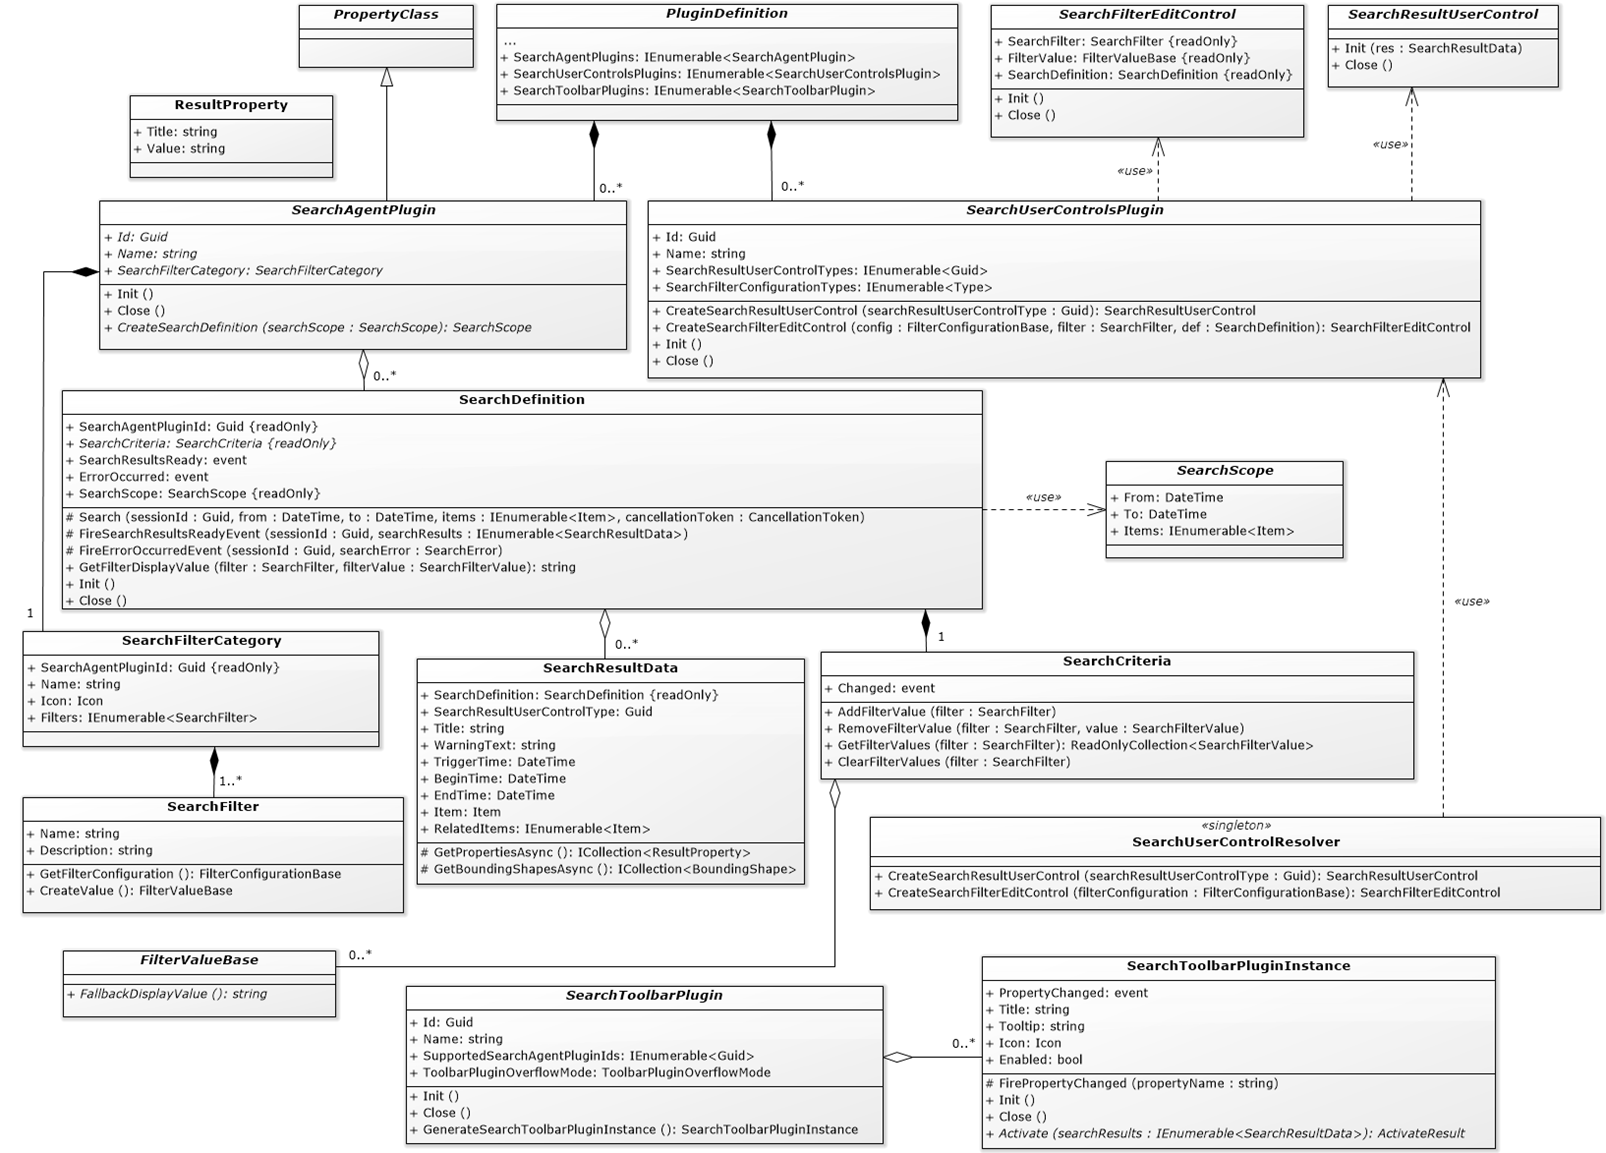
Building Search Agent Basics
A Search agent consists of these parts:
PluginDefinition
A class inherited from the PluginDefinition acts as the main entry to a MIP plug-in. The Smart Client recognizes a .NET assembly as a MIP plug-in if it contains a PluginDefinition-ancestor class. The PluginDefinition has a few overrides related to search: SearchAgentPlugins, SearchUserControlsPlugins and SearchToolbarPlugins. You override these members to customize the Smart Client’s Search workspace.
SearchAgentPlugin
A class that manifests a Search agent in the Smart Client and acts as an entry point to the Search agent. The SearchAgentPlugin describes a new Search agent to the Smart Client and acts as the class factory for SearchDefinitions.
SearchDefinition
A class acting as an entry point to the search algorithm. The Smart Client fills SearchDefinition with all necessary parameters (SearchScope, SearchCriteria) and search for video recordings by calling the SearchDefinition.Search(…) method. This class must be inherited to create your Search agent.
|
Note: the |
|
Note: there are 2 To ensure your plugin works in both old and new Smart Clients, you must implement both methods. When implementing the old method, it is important not to use the |
SearchFilterCategory
A class accompanying the SearchDefinition class. An instance of the SearchFilterCategory class contains vital information about a particular Search agent: name of the search category, icon to be used for the Search agent, custom filters that are associated with the Search agent, and other parameters. This class cannot be inherited. In practice, you will use one of the derives of the SearchFilterCategory:
• PersonSearchFilterCategory: describes a search of people. All search agents of this category will be grouped together in the Smart Client.
• VehicleSearchFilterCategory: describes a search of vehicles. All search agents of this category will be grouped together in the Smart Client.
• OtherSearchFilterCategory: describes any search which does not belong to any standard category and will not be grouped in the Smart Client.
|
Note: It is recommended to use one of the standard categories (i.e. |
SearchFilter
If a Search agent is expected to receive some arguments, these arguments are described in an instance of the SearchCategory class as search filters. When a Search agent is activated to perform a search, the values of these search filters are read from the SearchCriteria (FilterValueBase-instances). The MIP offers several types of standard filters, but it is also possible to create new filter types by inheriting from the class SearchFilter. Furthermore, a Search plug-in can associate custom input controls for the SearchFilter-classes.
The SearchCategory can contain zero, one, or more SearchFilters.
Creating a Search Plug-in
When creating a new Search plug-in, the first thing to do is to create a class deriving from the PluginDefinition class defined in the MIP SDK. To do this, remember to reference VideoOS.Platform.dll in your project. Depending on the purpose of the Search plug-in, you can customize Search agent behavior in three ways by overriding appropriate virtual methods:
1. SearchAgentPlugins returns an enumeration of Search agent plug-in instances.
2. SearchUserControlsPlugin returns an enumeration of UI plug-in instances that visualize search parameters and/or search results of specific types.
3. SearchToolbarPlugins returns an enumeration of the Search toolbar actions that are included in the plug-in.
In your Search plug-in, you can choose to supply implementation of all or any combination of overrides. For example, you may want to add your search plug-in and customize how result items are displayed in the Results Area. In this case, you will override SearchAgentPlugins and SearchUserControlsPlugin, but leave out the SearchToolbarPlugins.
Implementing a SearchAgentPlugin
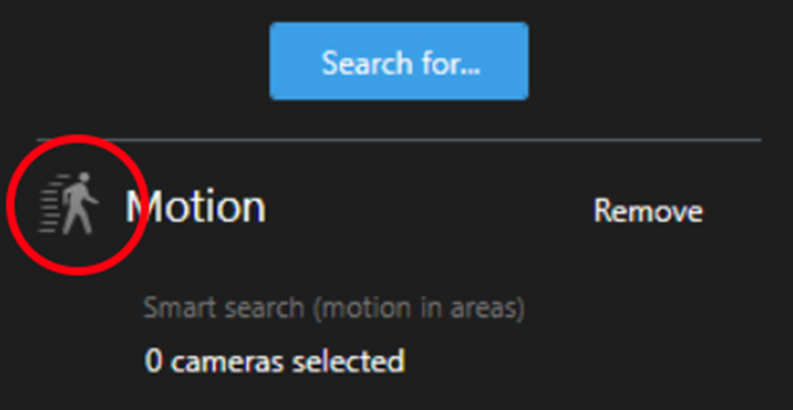
You create a Search agent plug-in by deriving a class from SearchAgentPlugin. If your Search agent should have any search filters, you can add one or more classes derived from SearchFilter to represent those filters. In addition, you should provide the Search agent with an icon that help users identify your Search agent:
The same icon will be used in the Results Area for result items produced by the Search agent:
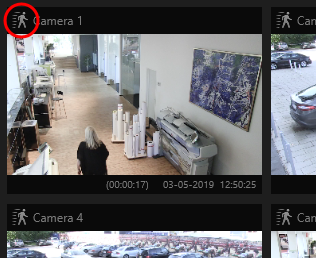
The 24x24 size is used in the Criteria pane and the 16x16 size is used in the Results pane. All sizes must be in single style. If a Search agent does not specify the icon, the Smart Client will use the standard MIP plug-in icon.
Let’s imagine you create an agent that searches for African animals. Follow these steps to implement the Search plug-in:
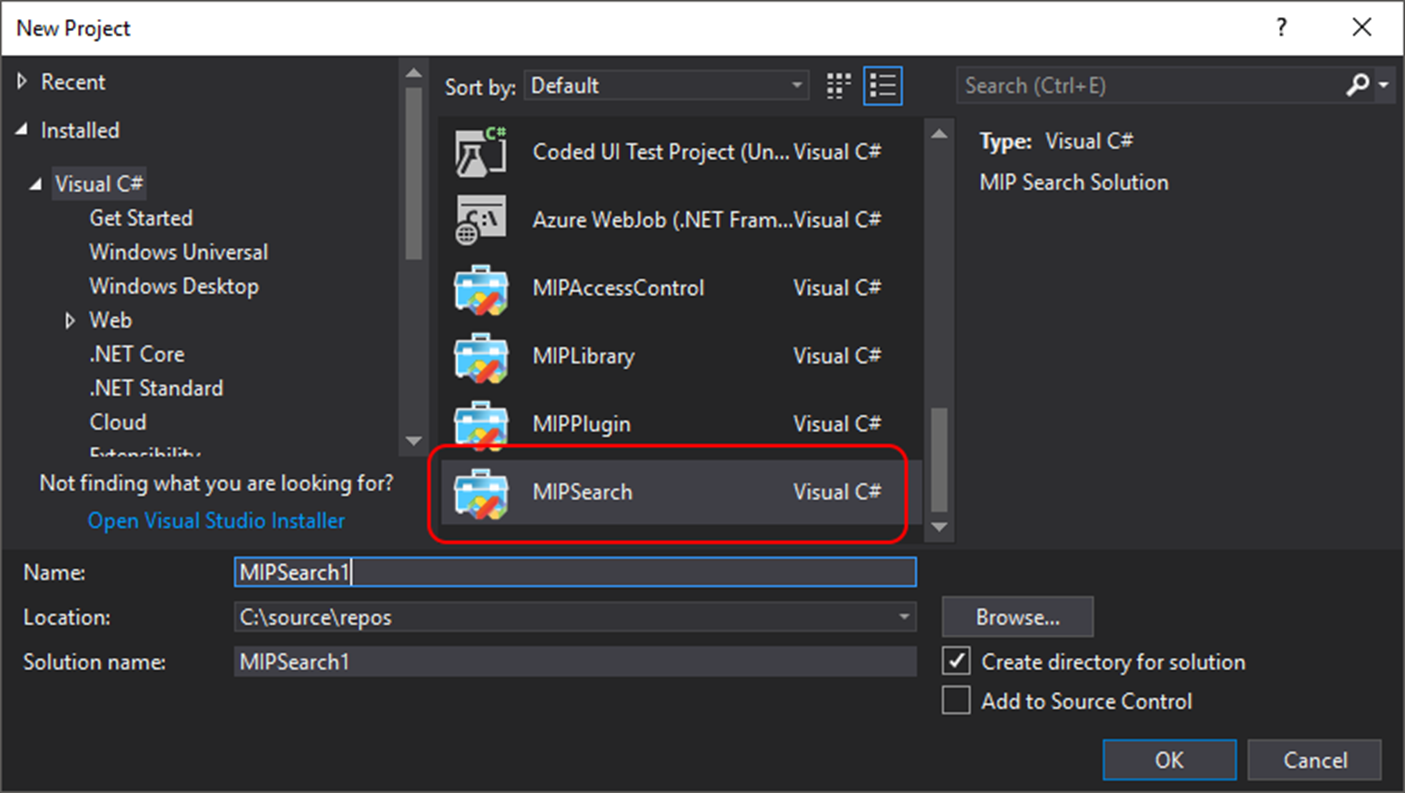
1. Start creating your search agent project SCAnimalsSearchAgent using the project template MIPSearch (refer to Visual Studio Template Project).
2. Locate a plug-in class: SCAnimalsSearchAgentSearchAgentPlugin (inherited from SearchAgentPlugin).
3. Assign the plug-in a unique Id and a Name. The Name is for internal use. For example, you can use it to identify your plug-in instance in a debug session.
4. Override the Init-method and return an instance of the Search category. A category name should be plural and easily identified as category, e.g. “People”, “Vehicles”, “Alarms”, etc.
In our case, the name of the category could be “Animals”.
5. Ensure that method CreateSearchDefinition returns a new instance of the SCAnimalsSearchAgentSearchDefinition (inherited from SearchDefinition) that will perform search.
public class SCAnimalsSearchAgentSearchAgentPlugin : SearchAgentPlugin
{
…
public override SearchFilterCategory SearchFilterCategory { get; protected set; }
public override SearchDefinition CreateSearchDefinition(SearchScope searchScope)
{
return new SCAnimalsSearchAgentSearchDefinition(searchScope);
}
public override void Init()
{
SearchFilterCategory = new OtherSearchFilterCategory("Animals", null,
new SearchFilter[0]);
}
|
Note: Setting SearchFilterCategory to an instance of Here is a code snippet from public override void Init() {
// We use the existing "Person" category for this search agent.
// It is strongly recommended to use the existing categories whenever it is
// possible.
SearchFilterCategory = new PersonSearchFilterCategory("People with accessories",
null, PersonSearchFilterCategory.StandardSearchFilters.None, new SearchFilter[] {
SCPeopleWithAccessoriesSearchDefinition.AccessoryTypeFilter }); } |
Search definition
A Search definition instance aggregates search criteria and implements a specific search algorithm. The Search definition receives a list of selected cameras and a time interval to perform the search and is expected to return video results that match the search criteria.
For the provided Search category, you can also specify which specific filters your Search agent can use. So, in our example Search agent, search filters could be “Animal family”, “Animal species”, etc.
Now, when your Search plug-in assembly exposes a custom SCAnimalsSearchAgentSearchDefinition class with a Search category defined, the Smart Client should display your Search agent in the Search category section:
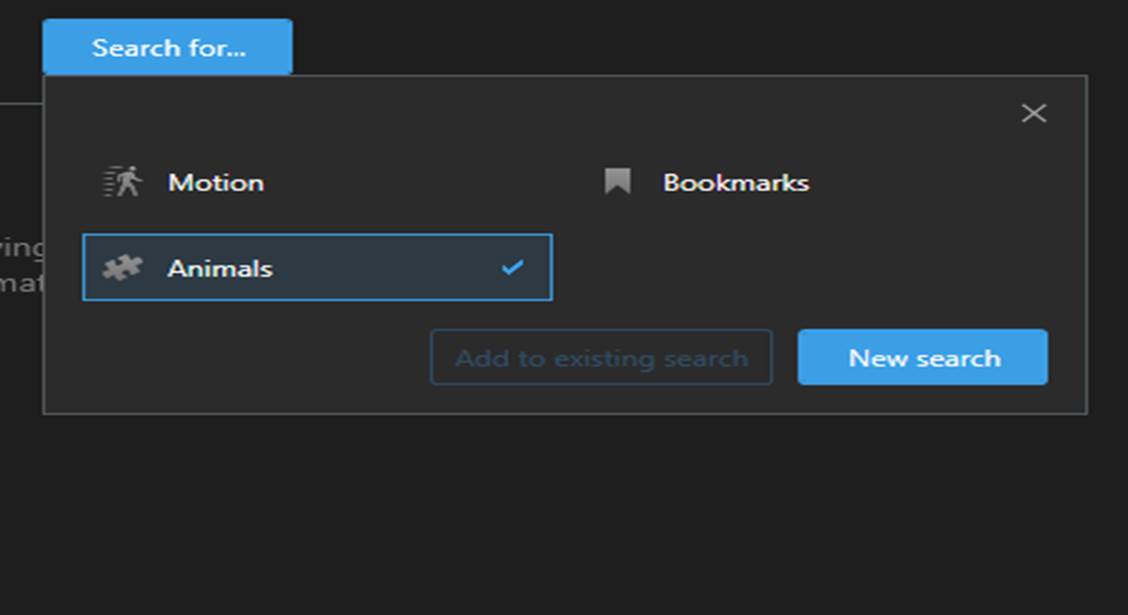
To provide actual search results, your SearchDefinition class must implement the Search(…) method and return selected results.
Implementation of the Search method is up to the developer, but a few notes will help make your implementation efficient:
1. Search is executed in an isolated unattended worker thread – your algorithm will not interfere with the client application main thread.
2. Search(…) must return results using the SearchResultsReady events (see next section). Note that it is very much encouraged to respect the sort order provided in SearchInput.SortOrder. This will avoid “flickering results” in the results area which can occur when they are delivered in reverse order.
3. Run-time errors in the Search method will be caught and forwarded into the client application as ErrorOccured events. You can intentionally raise ErrorOccured events to indicate that something went wrong with the search parameters, the algorithm itself, etc. For more details, refer to “Reporting errors during search”.
4. You are free to implement Search the way you want it: as linear method or incorporate worker threads to improve performance and scalability. For example, if your search implementation needs data from several servers, you call them in parallel to reduce wait time. However, be aware that the Search method itself must not return until the search has finished. Any results produced after the Search method returns will be ignored.
5. You should avoid any interaction with the UI from the Search(…) method. If needed, use events, debug- or file-trace, etc.
6. A Search agent could be informed to cancel search at any time. This happens when the user changes search criteria or exits the application. The cancellation is signaled using a CancellationToken. Thus, you must ensure that the Search agent checks the cancellation token regularly and abort execution if requested.
Search results
A search result is represented by a SearchResultData instance. Some of the SearchResultData properties is described in detail below.
SearchResultData.Id
Each SearchResultData has an Id (Guid). This Id is used to identify specific result between different searches. The Id must remain the same for underlying video recordings. In other words, if SearchDefinition.Search(…) is called several times and produce the same video recording as the result, all instances of the SearchResultData, referring this video recording, must have same Id. This allows the Smart Client to track items selection in the Results Area.
Summarizing, the Ids must fulfill following criteria:
• The SearchResultData.Id must be same for same video recording between searches.
• The Search(…) executed with same filters, must produce search results with same Ids.
• It is required that a unique Id for the SearchResultData is assigned. Failing to do so will cause unexpected behavior in the Smart Client.
|
Note for implementor: You can use the utility method • The Id identifying the object(s) that the search result is representing. • The result start, trigger, and end times. • The camera device associated with the search result. |
SearchResultData.BeginTime, SearchResultData.EndTime
The timestamps (UTC) marking the sequence related to the search result where it is guaranteed that the search query is satisfied.
SearchResultData.TriggerTime
The timestamp (UTC) marking the event which triggered the sequence. This value should be inside the BeginTime to EndTime time interval.
SearchResultData.BeginTimeWithPadding, SearchResultData.EndTimeWithPadding
The timestamp (UTC) marking the beginning of the sequence including any desired padding. Ideally the BeginTime and EndTime identifies the complete sequence that satisfies the search query and therefore this property should not be used (leave it either unset, set it to DateTime.MinValue or give it the same value as BeginTime. However, in cases where a search agent can not completely ensure that the BeginTime is the start of the relevant sequence it might be useful to extend the sequence by adding some padding which can be accomplished by setting this property. An example of this is a license plate recognition system that only detect the license plate of a vehicle once when it drives by the camera. In that case BeginTime, TriggerTime and EndTime should be set to the same timestamp, and BeginTimeWithpadding and EndTimeWithpadding can be used to provide some length to the result sequence, even though it is not guaranteed that the car is actually visible in the video the whole duration.
Note that when BeginTimeWithpadding is either not set or set to DateTime.MinValue the getter will return the value of BeginTime. This ensures that the users of BeginTimeWithpadding does not need to understand and adjust for the unset, or the DateTime.MinValue.
SearchResultData.GetBoundingShapesAsync(DateTime, CancellationToken)
This method is used to provide bounding shapes at the provided time. Bounding shapes will be visible on the search result cards in the UI as well as in the preview player in the search tab.
Note that bounding shapes which originate from a metadata stream should not returned in this method. The Smart Client will automatically load metadata bounding shapes for the Object IDs provided in the GetMetadataObjectsAsync() method.
SearchResultData.GetMetadataObjectsAsync(CancellationToken)
This method is used to provide metadata Object IDs which the Smart Client in turn will use to look up bounding shapes for the search result card as well as in the preview player.
Returning search results
A Search agent can return results in chunks by raising the event SearchResultsReady (using the protected OnSearchResultsReady method) every time a chunk of results is ready. Also, the method can return the results as one big chunk in a single OnSearchResultsReady event. The chunk size is completely up to the author of the Search agent plug-in. When execution exits Search(…), the search is considered finished, and all further results are ignored.
|
Note: When a search is performed using multiple search agents, the Smart Client uses a combination algorithm to combine results from different search agents, if they satisfy certain conditions. For this reason, you may see a different number of results than you expect, and as such you should test your search agent in isolation to ensure that it delivers the results you expect. To read more about the combination logic, please see the Smart Client user guide. |
Reporting errors during search
If a Search agent encounters an error while executing the Search(…) method, it can signal this error to the Smart Client by rising an ErrorOccured event (using the protected method FireErrorOccurredEvent). If possible, the Search agent can continue working. For example, if recordings are not available for one camera, search could be continued for the other cameras selected in the search criteria.
But if an error does not allow further execution, a Search agent must report an error, stop, and leave the Search.
Customizing search filters
It is possible to supply additional search criteria to a Search agent. This is achieved by adding custom filters into the SearchFilterCategory instance associated with the Search agent.
Suppose you want to enrich your SCAnimalsSearchAgentSearchAgentPlugin with a Boolean search filter “Animals eating”
In this case, you will add a new class AnimalActivityFilter derived from SearchFilter:
public class AnimalActivityFilter : SearchFilter
{
public AnimalActivityFilter()
{
AddValueToSearchCriteriaByDefault = true;
}
public override FilterConfigurationBase GetFilterConfiguration()
{
return new CheckBoxFilterConfiguration() { CheckBoxTextValue = "Animals eating", DisplayMode = EditControlDisplayMode.SnapToParentWidth };
}
public override FilterValueBase CreateValue()
{
BoolFilterValue value = new BoolFilterValue();
ResetValue(value);
return value;
}
public override void ResetValue(FilterValueBase value)
{
BoolFilterValue boolFilterValue = value as BoolFilterValue;
if (boolFilterValue == null)
{
throw new ArgumentException("Does not match expected type: " +
typeof(BoolFilterValue).Name,
nameof(value));
}
boolFilterValue.Value = false;
}
}
and refer a new search filter in the SearchFilterCategory’s Filters collection:
public class SCAnimalsSearchAgentSearchDefinition : SearchDefinition
{
internal static readonly AnimalActivityFilter ActivityFilter = new AnimalActivityFilter() { Name = "Animal activity" };
…
}
public class SCAnimalsSearchAgentSearchAgentPlugin : SearchAgentPlugin
{
…
public override void Init()
{
_searchFilterCategory = new OtherSearchFilterCategory("Animals", null,
new SearchFilter[]
{
SCAnimalsSearchAgentSearchDefinition.ActivityFilter,
});
}
}
With these changes in the Smart Client’s Search criteria, your Search agent should look like:
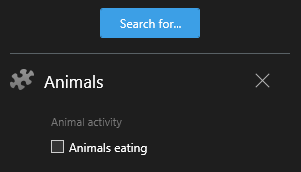
The value of this filter can then be read in the SearchDefinition.Search() method in this way:
SearchCriteria.GetFilterValue(SCAnimalsSearchAgentSearchDefinition.ActivityFilter);
Some of the built-in filter values have an “empty” state which basically means it will be visible in the UI, but the call in the line above will return an empty collection in this case. When writing custom filters and/or filter values, you may want to define what “empty” means for your specific filter (value). This is done by overriding the SearchFilter.IsEmptyValue() method and return True when the provided value is considered “empty”. If the value is not the specific filter (value) you wish to control the “empty” state for, you should always call the base implementation because this holds the default “empty” implementation for the built-in types.
Adding Custom Actions
If a Search agent should be able to perform custom actions on the search result items, it needs to expose appropriate SearchToolbarPlugin-derived classes and refer to this Action bar plug-in in the SearchPluginDefinition’s override for the SearchToolbarPlugins property. The role of the SearchToolbarPlugin class is to supply the Smart Client with a new plug-in instance (of type SearchToolbarPluginInstance) in the method GenerateSearchToolbarPluginInstance(). When clicking the Action bar button, the Smart Client will call GenerateSearchToolbarPluginInstance, and will then call the Activate method for the returned object. This allows the Action bar plug-in to be activated in different contexts: in the main window, and in one or more floating windows.
The result actions in the Action bar are grouped into primary actions (1) and secondary actions (2). As a rule, custom Search agent actions are defined as secondary actions. However, it is possible to add a custom action to the primary actions group in the Action bar (they will always appear after built-in actions). The name of the action should be meaningful and active, using a verb in the name (Example: “Export results”, “Print”).
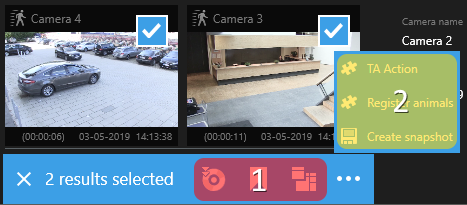
An icon for the action bar button must be in a white flat style in the two sizes 24x24 px and 16x16 px.
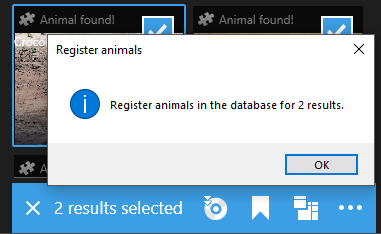
Let’s now imagine that you want to add the action “Register in the database” to your Animals Search agent for selected results.
In this case, locate class SCAnimalsSearchAgentSearchToolbarPlugin and change the method GenerateSearchToolbarPluginInstance as follow:
public class SCAnimalsSearchAgentSearchToolbarPlugin : SearchToolbarPlugin
{
…
public override SearchToolbarPluginInstance GenerateSearchToolbarPluginInstance()
{
// Sample code
return new SCAnimalsSearchAgentSearchToolbarPluginInstance
{
Title = "Register animals",
Tooltip = "Click to register animals in the database."
};
}
}
Then modify SCAnimalsSearchAgentSearchToolbarPluginInstance to perform desired action:
public class SCAnimalsSearchAgentSearchToolbarPluginInstance : SearchToolbarPluginInstance
{
public override ActivateResult Activate(IEnumerable<SearchResultData> searchResults)
{
MessageBox.Show($"Register animals in the database for {searchResults.Count()} results.",
"Register animals",
MessageBoxButton.OK,
MessageBoxImage.Information);
return ActivateResult.Default;
}
}
After compilation and deployment, your action should appear in the Actions bar:
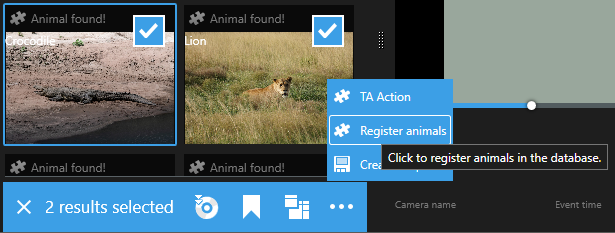
Selecting this action will display the expected result:
Customizing UI
The Smart Client search engine provides a set of standard UI controls for displaying and entering following data types when the user sets the search filters:
|
Base type |
Search filter configuration type |
Built-in Smart Client control |
When to use the control |
|---|---|---|---|
|
|
|
|
Input field: User can search for words, numbers that are not specific values, or a combination of letters and numbers. Examples: bookmark headings, license plate numbers. Displayed inline. |
|
|
|
|
Checkbox: User can select true/false or yes/no. Example: “Include archived recordings”: Yes or No. Displayed inline. |
|
|
|
|
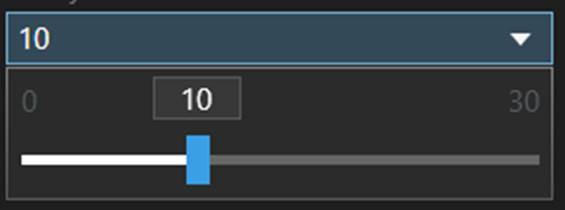
Slider with one handle: User can select a specific value. Example: A movement threshold. Displayed inline. |
|
|
|
|
Slider with two handles: User can select a specific value range. Examples: Age, Height, Speed. Displayed inline. |
|
Multiple selection |
|
|
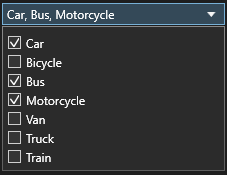
Multi-selection dropdown list: User can select more than one option. Example: Vehicle types. Displayed inline if 10 or less items, and in a popup if more than 10 items. |
|
Region selection |
|
|
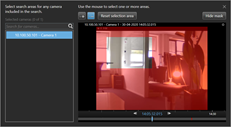
Camera masking control: User can apply a mask on the cameras from the scope. Masks can then be used in search agent to isolate the search to specific regions of the images. |
The above means that a Search agent can define how the Smart Client renders search filters by returning appropriate instances of classes derived from FilterConfiguration. Please note that these definition rules apply:
• If a Search agent uses a custom filter configuration or needs to display a standard configuration in a customized way, the configuration must be ‘translated’ into the UI control by the Search agent. To do this, the Search agent must return an instance of a class derived from SearchUserControlsPlugin.
• In the filter configuration (FilterConfiguration) you can specify how the filter must be displayed in the UI by setting FilterConfigurationBase.DisplayMode value:
|
Display mode |
Description |
|---|---|
|
|
Display control in-line, do not resize control to the parent controls width. |
|
|
Display control in-line, snap to the width of the parent control. |
|
|
Display control in a popup, do not resize control to the parent controls width. |
|
|
Display control in a popup, inherit the control width from the parent popup control. |
|
|
Display control in a modal dialog. This is only |
InDialog mode will place a standard control with a filter summary text and button for displaying of the filter configuration modal dialog:
The sample filter “Area to observe” will be displayed as:
Pressing the button “Edit filter” will open the modal dialog with the filter control placed inside it. Both wrapper control above and the modal dialog are parts of the Search framework and displayed automatically by the hosting application (by the Smart Client).
• If the filter is not rendered inline in the criteria pane, it must be summarized in a one-line string (e.g. for the color filter, the value would be: Red or Blue).
Suppose you want to display an animal’s family (string value) filter, using the multi-selection control.
For that, you make GetFilterConfiguration to return ListSelectionFilterConfiguration for the SCAnimalsSearchAgentSearchFilter.
No other handling is needed for the SCAnimalsSearchAgentSearchDefinition.FamilyFilter – the Smart Client will use the built-in multi-selection control for the filter.
public class SCAnimalsSearchAgentSearchFilter : SearchFilter
{
static readonly Guid _guidFilterMammals = Guid.NewGuid();
static readonly Guid _guidFilterReptiles = Guid.NewGuid();
public override FilterValueBase CreateValue()
{
FilterValueBase value = null;
if (this == SCAnimalsSearchAgentSearchDefinition.FamilyFilter)
{
value = new SelectionFilterValue();
}
if (value != null)
{
ResetValue(value);
}
return value;
}
public override void ResetValue(FilterValueBase value)
{
if (this == SCAnimalsSearchAgentSearchDefinition.FamilyFilter)
{
SelectionFilterValue selectionFilterValue = value as SelectionFilterValue;
if (selectionFilterValue == null)
{
throw new ArgumentException("Does not match expected type: " +
typeof(SelectionFilterValue).Name,
nameof(value));
}
selectionFilterValue.SelectedIds.Clear();
}
}
public override FilterConfigurationBase GetFilterConfiguration()
{
if (this == SCAnimalsSearchAgentSearchDefinition.FamilyFilter)
{
var cfg = new ListSelectionFilterConfiguration();
// items could be added using .Add method...
cfg.Items.Add(_guidFilterMammals, "Mammals");
// ... or using indexer
cfg.Items[_guidFilterReptiles] = "Reptiles";
return cfg;
}
return default(FilterConfigurationBase);
}
}
Now let’s imagine you decide to add a custom UI to the Animals Search agent.
In this case, you will amend your SCAnimalsSearchAgentPluginDefinition as follow:
public class SCAnimalsSearchAgentPluginDefinition : PluginDefinition
{
…
public override IEnumerable<SearchUserControlsPlugin> SearchUserControlsPlugins { get; } = new[] { new SCAnimalsSearchAgentSearchUserControlsPlugin() };
…
}
With this change, when the search engine needs to display search filters in the UI for your AnimalsSearch agent, it will ask the provided instance of the SCAnimalsSearchAgentSearchUserControlsPlugin to resolve the search filter into the UI elements.
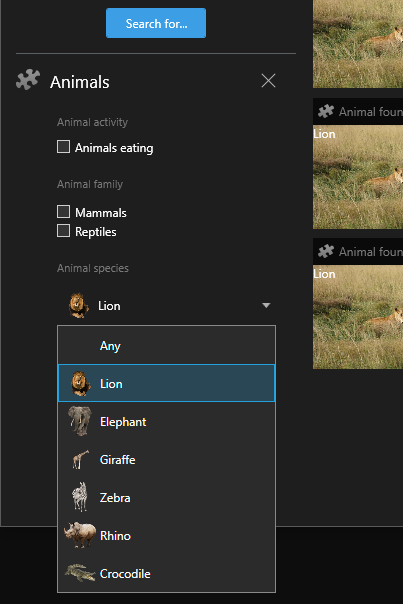
And finally, you decide to display an animal species filter with a custom dropdown combo-box. In this case, you resolve SpeciesFilter into your SCAnimalsSearchAgentFilterConfiguration.
Then map this configuration into your custom combo-box control SCAnimalsSearchAgentSearchFilterEditControl in the CreateSearchFilterEditControl (class SCAnimalsSearchAgentSearchUserControlsPlugin):
public class SCAnimalsSearchAgentSearchFilter : SearchFilter
{
public override FilterConfigurationBase GetFilterConfiguration()
{
if (this == SCAnimalsSearchAgentSearchDefinition.FamilyFilter)
{
var cfg = new ListSelectionFilterConfiguration();
// items could be added using .Add method...
cfg.Items.Add(_guidFilterMammals, "Mammals");
// ... or using indexer
cfg.Items[_guidFilterReptiles] = "Reptiles";
return cfg;
}
else if (this == SCAnimalsSearchAgentSearchDefinition.SpeciesFilter)
{
return new SCAnimalsSearchAgentFilterConfiguration() { DisplayMode = EditControlDisplayMode.SnapToParentWidth };
}
else if (this == SCAnimalsSearchAgentSearchDefinition.AreaFilter)
{
return new SCAnimalsSearchAgentFilterConfiguration() { DisplayMode = EditControlDisplayMode.InDialog };
}
return default(FilterConfigurationBase);
}
public override SearchFilterValue CreateValue()
{
FilterValueBase value = null;
if (this == SCAnimalsSearchAgentSearchDefinition.FamilyFilter)
{
value = new SelectionFilterValue();
}
else if (this == SCAnimalsSearchAgentSearchDefinition.SpeciesFilter)
{
value = new StringFilterValue();
}
else if(this == SCAnimalsSearchAgentSearchDefinition.AreaFilter)
{
value = new StringFilterValue();
}
if (value != null)
{
ResetValue(value);
}
return value;
}
public override void ResetValue(FilterValueBase value)
{
if (this == SCAnimalsSearchAgentSearchDefinition.FamilyFilter)
{
SelectionFilterValue selectionFilterValue = value as SelectionFilterValue;
if (selectionFilterValue == null)
{
throw new ArgumentException("Does not match expected type: " +
typeof(SelectionFilterValue).Name,
nameof(value));
}
selectionFilterValue.SelectedIds.Clear();
}
else if (this == SCAnimalsSearchAgentSearchDefinition.SpeciesFilter)
{
StringFilterValue stringFilterValue = value as StringFilterValue;
if (stringFilterValue == null)
{
throw new ArgumentException("Does not match expected type: " +
typeof(StringFilterValue).Name,
nameof(value));
}
((StringFilterValue)value).Text = "Lion";
}
else if (this == SCAnimalsSearchAgentSearchDefinition.AreaFilter)
{
((StringFilterValue)value).Text = "Custom area";
}
}
}
public class SCAnimalsSearchAgentSearchUserControlsPlugin : SearchUserControlsPlugin
{
…
public override IEnumerable<Type> SearchFilterConfigurationTypes { get; } = new[] { typeof(SCAnimalsSearchAgentFilterConfiguration) };
public override SearchFilterEditControl CreateSearchFilterEditControl(FilterConfigurationBase filterConfiguration, SearchFilter searchFilter, SearchDefinition searchDefinition)
{
if (filterConfiguration is SCAnimalsSearchAgentFilterConfiguration)
{
return new SCAnimalsSearchAgentSearchFilterEditControl(searchFilter, searchDefinition);
}
return base.CreateSearchFilterEditControl(filterConfiguration, searchFilter, searchDefinition);
}
…
}
The result is illustrated in the next picture:
Refer to the Sample Search agents code for a full listing.
Passing filter value from the UI into the SearchDefinition
Now, in the custom user control for selecting an animal species, you need to pass the user input to the search definition (SCAnimalsSearchAgentSearchDefinition). In the user control, this could be done by writing a value into the FilterValue field of the control:
public partial class SCAnimalsSearchAgentSearchFilterEditControl : SearchFilterEditControl
{
private int _selectedIndex;
public ObservableCollection<Species> Species => new ObservableCollection<Species>()
{
…
};
public int SelectedIndex
{
get { return _selectedIndex; }
set
{
_selectedIndex = value;
var av = (StringFilterValue)FilterValue;
av.Text = Species[_selectedIndex].Name;
}
}
…
}
The FilterValue is defined in the SearchFilterEditControl (the parent class of any filter editor)
In the SCAnimalsSearchAgentSearchDefinition the filter value is available through the SearchCriteria field:
var speciesValue = (StringFilterValue)SearchCriteria.GetFilterValues(SpeciesFilter).FirstOrDefault();
|
Note: the API supports multiple filter values per filter. However, the Smart client currently supports a single filter value per filter. That is why we use |
Associating custom properties with results
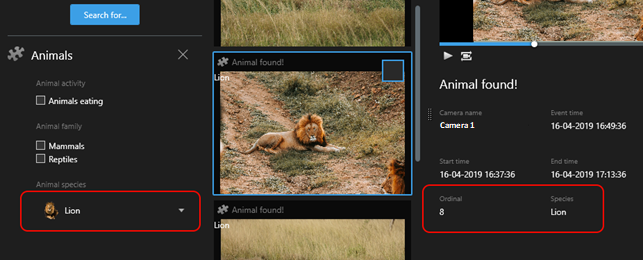
The search engine allows associating custom properties with search results. Any key-value pair that is added to the Properties collection of the SearchResultData instance will be displayed by the Smart Client in the Details Area of the Search workspace:
This can be done by overriding the method Task<Collection<ResultProperty>> GetPropertiesAsync() of the SearchResultData class.
Let’s attach the searched species to the Animals Search agent results.
To achieve that, you need to create the class AnimalsSearchResultData and override the GetProperties method:
public class AnimalsSearchResultData : SearchResultData
{
public static Guid AnimalsResultType = Guid.Parse("82077A43-5DA8-4206-934A-6FDF6F90DCDB");
public AnimalsSearchResultData(Guid id) : base(id)
{
SearchResultUserControlType = AnimalsResultType;
}
public int Ordinal { get; set; }
public string Species { get; set; }
protected override Task<ICollection<ResultProperty>> GetPropertiesAsync(CancellationToken token)
{
var props = new Collection<ResultProperty>()
{
new ResultProperty("Ordinal", Ordinal.ToString()),
new ResultProperty("Species", Species)
};
return Task.FromResult<ICollection<ResultProperty>>(props);
}
}
Customizing result items
The search engine allows Search agents to change the appearance of items in the Results Area.
This is done by the SearchUserControlsPlugin. Just override the virtual property SearchResultUserControlTypes to return a collection of the result item type IDs (Guid) for the provided custom UI.
When the search engine receives a new result item, it looks into the property SearchResultData.SearchResultUserControlType:Guid. Using this id, the engine decides which result control to use to display the result data item.
The Smart Client has a display control for the video SearchResultData-item with
SearchResultUserControlType = SearchResultUserControlTypes.Video
- this is the default type for result items (i.e. it is assumed that a Search agent returns video recordings result items). A Search agent may produce results of arbitrary types (by assigning its own id to the SearchResultUserControlType). For a result item with the custom SearchResultUserControlType, a Search agent must also supply a control to visualize it.
|
Note: A |
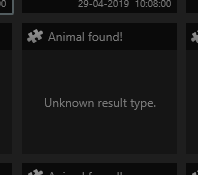
If the Smart Client encounters a search result item with an unknown SearchResultUserControlType, this result item will be displayed as an “Unknown result type”:

Thus, it is important to provide result items visualization controls for the result types introduced in the Search agent.
On the other hand, a Search agent can substitute visualization for result data types, declared by other Search agents (and even by the Smart Client!).
Let’s see how we can alter the appearance of results items in our SCAnimalsSearchAgent.
Developer is asked to mark result items found by the SCAnimalsSearchAgent.
Here are the implementation steps:
1. Create a user control class that inherits from the SearchResultUserControl.
|
Note: You need to update the XAML file manually to make the control derive from the |
public partial class AnimalsResultControl : SearchResultUserControl
{
public AnimalsResultControl()
{
InitializeComponent();
}
public override void Init(SearchResultData searchResultData)
{
var result = (AnimalsSearchResultData)searchResultData;
…
}
}
In XAML:
<search:SearchResultUserControl x:Class="SCAnimalsSearchAgent.SearchUserControl.AnimalsResultControl"
xmlns="http://schemas.microsoft.com/winfx/2006/xaml/presentation"
xmlns:x="http://schemas.microsoft.com/winfx/2006/xaml"
xmlns:mc="http://schemas.openxmlformats.org/markup-compatibility/2006"
xmlns:d="http://schemas.microsoft.com/expression/blend/2008"
xmlns:local="clr-namespace:SCAnimalsSearchAgent.SearchUserControl"
xmlns:search="clr-namespace:VideoOS.Platform.Search;assembly=VideoOS.Platform"
mc:Ignorable="d"
d:DesignHeight="100" d:DesignWidth="100">
<Grid>
</Grid>
</search:SearchResultUserControl>
In the SearchResultData-derived class:
2. Assign a new Guid-value to the SearchResultUserControlType.
public class AnimalsSearchResultData : SearchResultData
{
public static Guid AnimalsResultType = Guid.Parse("82077A43-5DA8-4206-934A-6FDF6F90DCDB");
public AnimalsSearchResultData()
{
SearchResultUserControlType = AnimalsResultType;
}
...
}
In the SearchUserControlsPlugin-derived class:
3. Override property IEnumerable<Guid> SearchResultUserControlTypes to include the Guid from step 2.
4. Override SearchResultUserControl CreateSearchResultUserControl(Guid searchResultUserControlType) to return a new instance of the control created in the step 1:
public class SCAnimalsSearchAgentSearchUserControlsPlugin : SearchUserControlsPlugin
{
public override IEnumerable<Guid> SearchResultUserControlTypes { get; } = new [] { AnimalsSearchResultData.AnimalsResultType };
…
public override SearchResultUserControl CreateSearchResultUserControl(Guid searchResultUserControlType)
{
if (searchResultUserControlType == AnimalsSearchResultData.AnimalsResultType)
{
return new AnimalsResultControl();
}
return base.CreateSearchResultUserControl(searchResultUserControlType);
}
}
With these changes, the Smart Client will be able to recognize result items from our Search agent and display them in the Results Area using our control. Refer to the Sample search agents included in the MIP SDK to try out how all parts work together.
Implementation notes on result visualization control
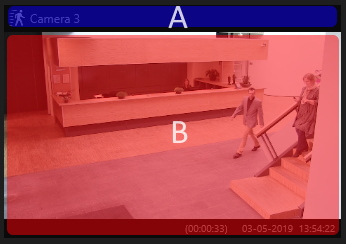
The result card consists of a header and a display area.
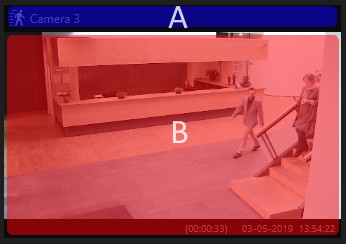
The Smart Client takes the title and the icon from the underlying video result item and renders the header (A) by itself. But the display area (B) is controlled by the Search agent controls plug-in.
When implementing the result visualization, it is important to remember that the control must scale in a wide range (from ~100 px width to entire Results Area).
|
Note: The aspect ratio of the result card can also vary but is aimed to be optimal for thumbnail display. Therefore, for a given width, the height of the display area (B) is calculated for the ratio 16:9 plus an additional footer of 19 px in height. |
The header will include:
• The icon (from the SearchCategory of the search agent)
• The title of the result card (from the SearchResultData)
• Optionally: The warning icon, if the SearchResultData.WarningText is not empty
Here is listing of the sample result control:
public partial class AnimalsResultControl : SearchResultUserControl
{
public AnimalsResultControl()
{
InitializeComponent();
DataContext = this;
}
public ImageSource Image { get; set; }
public string Species { get; set; }
static Random _rnd = new Random();
public override void Init(SearchResultData searchResultData)
{
var result = (AnimalsSearchResultData)searchResultData;
Species = result.Species;
Image = LoadBitmapImageResource($"{Species}{_rnd.Next(1,3).ToString()}.jpg");
OnPropertyChanged(nameof(Image));
OnPropertyChanged(nameof(Species));
}
private static BitmapImage LoadBitmapImageResource(string resourceName)
{
try
{
var s = $"pack://application:,,,/SCAnimalsSearchAgent;component/SearchUserControl/Images/{resourceName}";
return new BitmapImage(new Uri(s));
}
catch
{
return null;
}
}
}
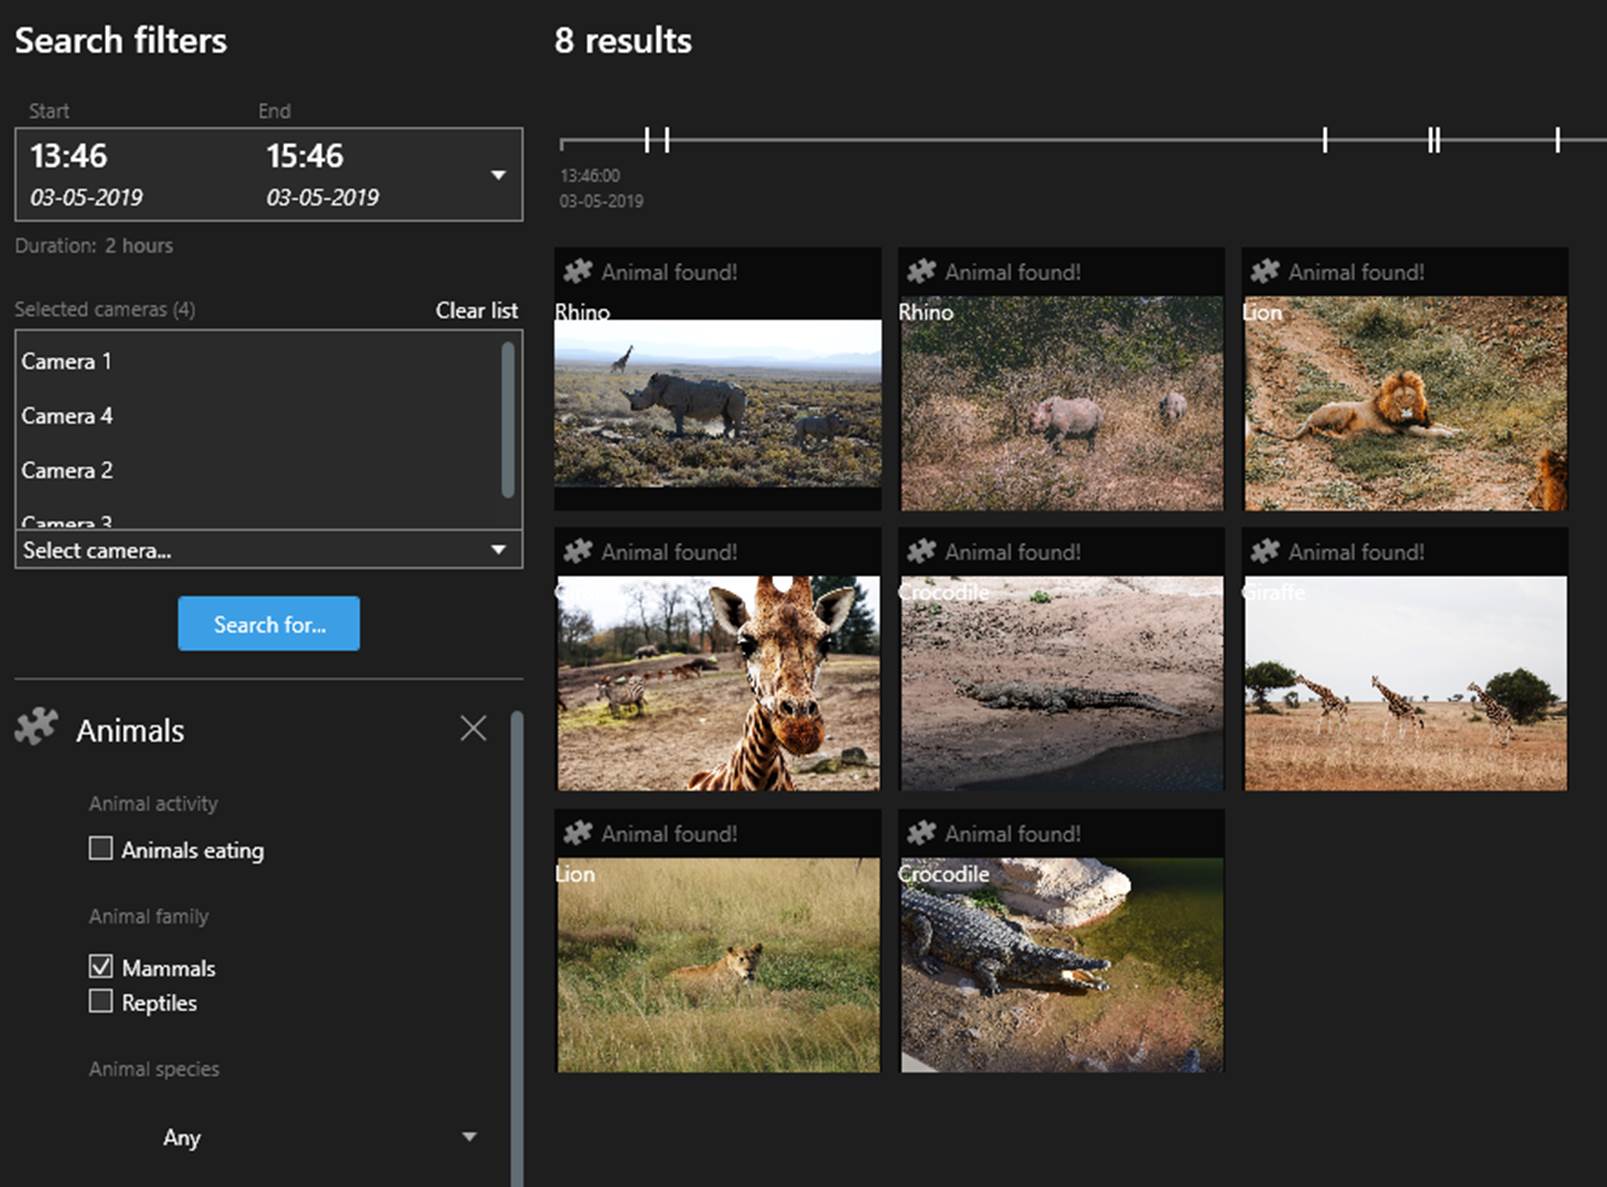
In this sample, actual thumbnails are replaced with some random images for simplicity.
XAML:
<search:SearchResultUserControl x:Class="SCAnimalsSearchAgent.SearchUserControl.AnimalsResultControl"
xmlns="http://schemas.microsoft.com/winfx/2006/xaml/presentation"
xmlns:x="http://schemas.microsoft.com/winfx/2006/xaml"
xmlns:mc="http://schemas.openxmlformats.org/markup-compatibility/2006"
xmlns:d="http://schemas.microsoft.com/expression/blend/2008"
xmlns:local="clr-namespace:SCAnimalsSearchAgent.SearchUserControl"
xmlns:search="clr-namespace:VideoOS.Platform.Search;assembly=VideoOS.Platform"
mc:Ignorable="d"
d:DesignHeight="100" d:DesignWidth="100">
<Grid>
<Image Source="{Binding Image}"/>
<TextBlock Text="{Binding Species}" Foreground="White" />
</Grid>
</search:SearchResultUserControl>
After compilation and deployment, we can see our test control in the Smart Client:
Windows Forms support
It is recommended to develop Search agents using most recent version of the .NET Framework libraries. But Search agent can be created basing on the existing components that are developed using the Windows Forms library. Such Search agent still can be hosted by the Search frameworks, although with certain limitations (described below).
The Search framework does not support in-line display of the WinForms components neither in Search Criteria popup editor nor in the Category selection panel. These components can only be displayed in the hosting modal dialog:
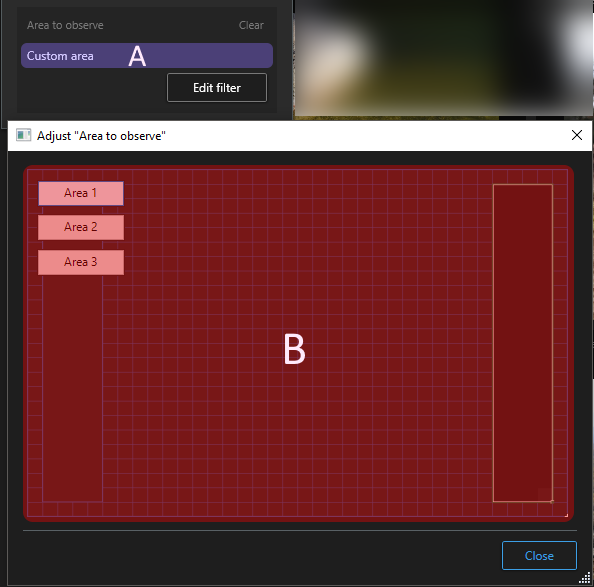
A: the custom filter summary, B: the custom filter area in the hosting dialog
To make filter display in the dialog, you must set FilterConfigurationBase.DisplayMode to InDialog (refer to Customizing UI for more information).
When displayed in the dialog, search filter is added to the search criteria by changing SearchFilter.Value.
Sample Search agents
A sample Search plug-in is available from the Milestone plugin samples repository at https://github.com/milestonesys/mipsdk-samples-plugin/tree/main/SCSearchAgent and also included in the MIP SDK release 2019 R2 or later, available for download at https://www.milestonesys.com/community/developer-tools/sdk/
The Search plug-in is named “SCSearchAgent” in the MIP SDK release 2021 R1 or later, and “SCAnimalsSearchAgent” in MIP SDK releases before 2021 R1.
The SCSearchAgent plug-in contains two search agents:.
• SCAnimalsSearchAgent, a Search agent that implements a fictional search provider that finds animals.
• SCPeopleWithAccessoriesSearchAgent, a Search agent that implements a fictional search provider that finds people with certain accessories.
The sample does not do actual search but demonstrates how to develop and integrate 3rd-party Search agents into the Smart Client. The search results generated by these Search agents are not real search results and some of the Search filters do no actual filtering.
The sample demonstrates:
• How to develop a Search agent.
• How to include filters of a Search agent in a built-in search category or a custom one
• How to develop actions for the Action bar of the Results pane.
• How to create custom input controls for search filters.
• How to customize results cards of the search result pane.
Please refer to the sample description at Building Search agents
Visual Studio Template Project
To simplify development of the Search Agent plug-ins, Milestone has created project templates for Visual Studio 2019, and 2022. The project templates are available on Visual Studio Marketplace and also installed as part of the MIP SDK. The MIPSearch project template generates all necessary classes for the Search Agent plug-in and could be used as a good starting point for your development.
