Introduction to Rule System integration
Rule system integration makes it possible to expose plug-in specified events in the rule system, which the administrator can configure to trigger actions. Moreover, it is possible to add custom actions that can be triggered from both system and plug-in events. The support can be split in two different areas - events and actions. You can implement one or both.
Benefits
Implementing rule system support will bring your integration new extended possibilities in regards to interaction with the XProtect system. Your plug-in can trigger built-in system actions and you get a way to trigger actions in your plug-in based on multiple sources – including events from the XProtect system, other plug-ins or your own plug-in.
Development considerations
The rule system support is facilitated by the XProtect Event Server, and the plug-in must therefore be placed in the Event Server. In order to support for translations and icons of events and actions you also need to add the plug-in to the XProtect Management Client.
Defining event types
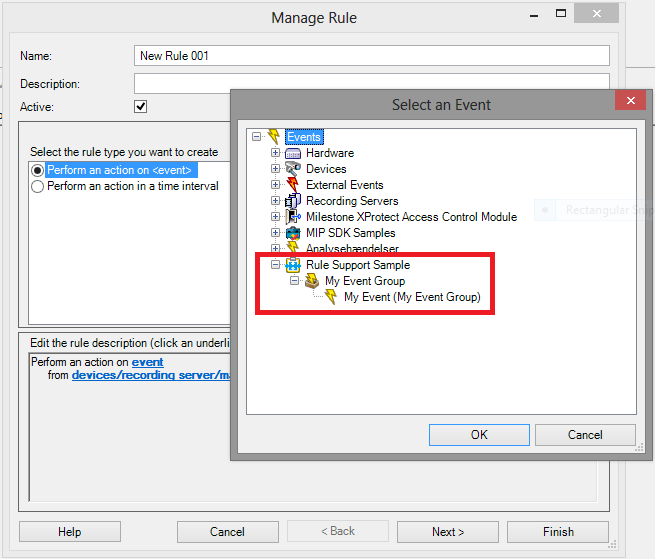
When creating a rule in the rule system actions are performed based on events.

Figure 1
As seen in Figure 1 the event types (and event groups) created in a plug-in will be placed under a separate node in the plug-in selection tree.
The event types are defined by implementing the ItemManager.GetKnownEventTypes(CultureInfo culture) method, which will return a collection of event types. The event type defines the event, including which source kinds may trigger the event. The source kinds may be either XProtect device kinds or plug-in kinds – mixing these kinds is not allowed. If the source kinds are left empty, the default will be all XProtect device kinds. Here is a short example of how to define the event types.
public override Collection<EventType> GetKnownEventTypes(CultureInfo culture)
{
    // Returning event types
    return new Collection<EventType>() {
        new EventType()
        {
            ID = EventTypeId, // Event type id
            Message = "My Event", // Name of event
            GroupID = GroupId, // Id of group
            SourceKinds = new List<Guid>(){ SourceKind }, //Source kinds
            DefaultSourceKind = Guid.Empty
        }};
}
In order to support event grouping, ItemManager.GetKnownEventGroups(CultureInfo culture) must be implemented and referenced in the event types.
public override Collection<EventGroup> GetKnownEventGroups(CultureInfo culture)
{
    // Returning event groups
    return new Collection<EventGroup>() {
        new EventGroup()
        {
            ID = groupId,
            Name = groupName
        }};
}
Trigger Events
Events can be triggered in multiple ways see “Introduction to Events and Alarms”. Note that when constructing events, the MessageId property on the EventHeader links to the event type ID and defines which event type it is. The MessageId field is used when matching the events in the rule system. The MessageId is a field on the EventHeader. For backwards compatibility, the Message field is used for matching if MessageId is not specified.
Defining actions
The rule system provides functionality to trigger actions when the conditions of the rule are satisfied. Often actions are triggered by incoming events – optionally within a time-profile. It is possible for your plug-in to define custom actions that can be triggered by system or plug-in events.
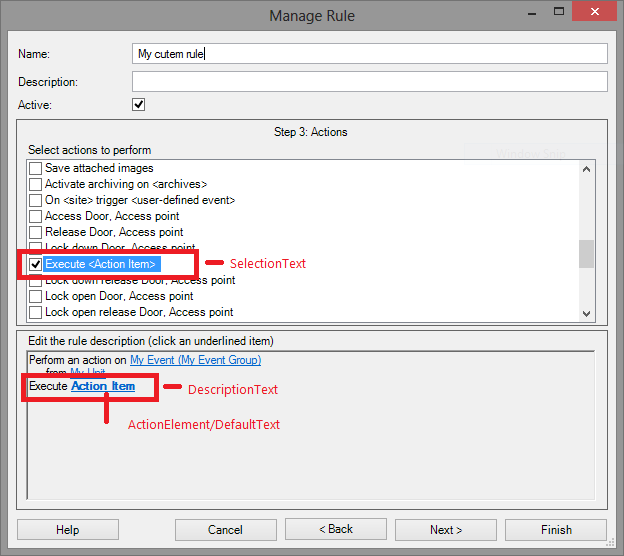
Selection of actions in the rule system is shown in Figure 2. In order to define actions and execute actions, an ActionManger class must be implemented and returned to the framework by overriding the ActionManger property on the PluginDefinition.
public override ActionManager ActionManager { get { return SampleActionManager; } }The ActionManager class has two methods that needs to be implemented.
public virtual Collection<ActionDefinition>  GetActionDefinitions();
public virtual void ExecuteAction(Guid actionId, Collection<FQID> actionItems, BaseEvent sourceEvent);
GetActionDefinitions is used to define the actions, and every ActionDefinition returned from this method will create an action entry in the rule system, as highlighted in Figure 2.
Here is a sample implementation of GetActionDefinitions:
///<summary>
/// Lists the available actions
///</summary>
///<returns></returns>
public override Collection<ActionDefinition> GetActionDefinitions()
{
    // Expose supported actions here
    return new Collection<ActionDefinition>()
        {
            new ActionDefinition()
                {
                    Id = ExecuteActionItemId,
                    Name = "Execute Action Item",
                    SelectionText = "Execute <Action Item>",
                    DescriptionText = "Execute {0}",
                    ActionItemKind = newActionElement()
                        {
                            DefaultText = "Action Item",
                            ItemKinds = new Collection<Guid>()
                                {
                                    SamplePluginDefinition.ActionItemKind
                                }
                        }
                }
        };
}
The ActionItemKind defines a collection of item kinds, on which the action can be executed. The ActionElement defines the ItemKinds which is the kinds of action items the user can select when configuring the action. The actual items must be implemented using an item manager just like other MIP items.

Figure 2
ExecuteAction will be called when the conditions of the rule are satisfied and an action must be triggered. The input parameters defines which action that has to be triggered (actionId), which action items that should executed (actionItems), and which event triggered the action (sourceEvent).
Please note that if the Stop condition is met, the Stop action will be triggered, no matter if the Start action has been executed or not. If you want to avoid this, your plug-in will have to keep track of whether the Start action has been executed.
Support info
From XProtect 2022 R2, MIP actions can be used as both Start and Stop actions. In versions prior to that, they can only be used as Start actions.