WebRTC - JavaScript client
This sample uses either a RESTful API or a WebSocket API for the signaling required to establish a WebRTC connection with an XProtect VMS through the API Gateway.
For more information, see Introduction to WebRTC support in XProtect.
Prerequisites
- For RESTful:
- XProtect 2023 R1 or later (stream, playback and TURN server configuration requires 2023 R3).
- For WebSocket:
- XProtect 2025 R1 or later.
- For audio support:
- XProtect 2025 R2 or later.
- Camera with H.264 protocol.
- An XProtect basic user, created locally, with access to the camera.
- Chrome, Edge, Firefox, or Safari web browser.
- CORS configuration if the sample webpage isn’t served from the same origin host URL as the API Gateway, see API Gateway CORS settings.
- If both browser and the API Gateway are on a local private network:
- Both on same local network segment and API Gateway supports
mDNS,
see WebRTC connection on a local network uses mDNS, or - Routers on local network doesn’t block
X-Forwarded-FororRemote_Addrheaders,
see WebRTC connections across routers in a local network, or - mDNS disabled in the browser,
see Disable browser mDNS support.
- Both on same local network segment and API Gateway supports
mDNS,
- If there’s a NAT between browser and the API Gateway, you’ll need a
STUN or TURN server:
- A TURN server is required if there’s a symmetric NAT between browser and the API Gateway. TURN servers usually also function as STUN servers.
- A STUN server is required if there’s a non-symmetric (Full Cone) NAT between browser and the API Gateway.
Setting up the WebRTC sample
You can open the sample webpage index.html in a browser
directly from the sample directory, or host the sample directory
WebRTC_JavaScript on a web server.
If you intend to serve the sample directly from the sample directory:
- Configure API Gateway CORS settings.
If you intend to serve the sample from a web server:
- Copy the
WebRTC_JavaScriptsample directory to a host with a web server, for example the API Gateway host. - Configure the web server to serve the sample directory at, for
example,
/WebRTC_JavaScript. - If the sample webpage is not served from the same host URL as the API Gateway, you must configure API Gateway CORS settings.
Configuration files
API Gateway configuration files are located in the installation
location, by default
%ProgramFiles%\Milestone\XProtect API Gateway\.
These configuration files are relevant for the sample:
appsettings.production.json: Overrides the configuration settings inappsettings.json.appsettings.json: Reverse proxy (routing), CORS, WebRTC, log levels, etc.
Editing configuration files
Use a validating editor to edit configuration files. Most popular code editors support JSON and XML syntax validation, either by default or through extensions.
Syntax errors in the API Gateway configurations files result in
502 Bad Gateway or 503 Service Unavailable
server errors and will show up in the Windows Application event log and
the IIS request log.
appsettings.json and appsettings.Production.json
Don’t edit
appsettings.jsonmanually. This file is created by the product installer and maintained by the Server Configurator.
If you need to override a configuration setting in
appsettings.json, create
appsettings.Production.json and add configuration overrides
here. appsettings.Production.json won’t be removed or
changed by product updates.
In appsettings.Production.json, include only the
properties that you need to override.
API Gateway CORS settings
If the sample webpage is not served from the same origin host URL as the API Gateway, the browser will block requests to the API Gateway from the sample scripts unless the API Gateway is configured to support CORS (Cross-Origin Resource Sharing).
CORS is disabled by default. You enable and configure CORS support by
creating and editing appsettings.production.json.
Create
appsettings.production.json(if not already created).For development and test purposes, you can use a very permissive policy:
{
  "CORS": {
    "Enabled": true,
    "Access-Control-Allow-Origin": "*",
    "Access-Control-Allow-Headers": "*",
    "Access-Control-Allow-Methods": "*"
  }
}
This will allow calls from any origin, including a local file system, to the API Gateway.
In a production environment, this is not secure, and CORS should be configured correctly in order to keep the system secure.
Restart the IIS, or at least recycle
VideoOS ApiGateway AppPool.
For more information about CORS, please refer to Cross-Origin Resource Sharing (CORS).
Running
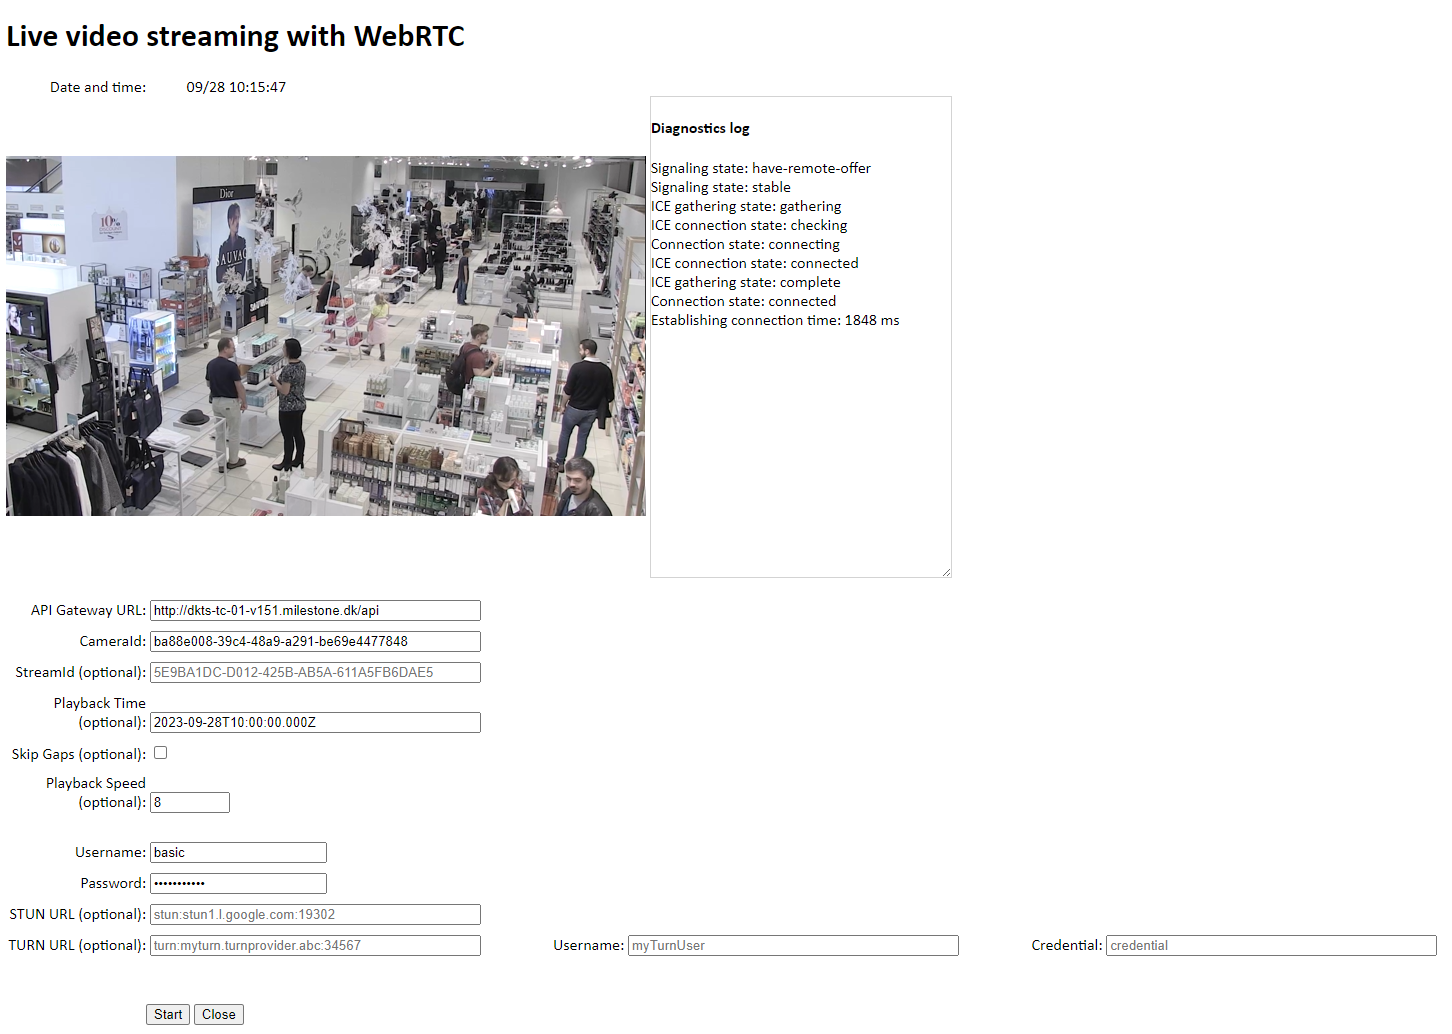
- Open
index.htmlin a browser - Enter the URL of the API Gateway.
Usually, the API Gateway is installed on the same host as the management server, that is, the API Gateway will be something likehttps://managementServer.example.com/api. - Enter the DeviceId. Supported device types are
camera with H.264 support or a microphone.
See Get a DeviceId. - Optionally, enter a StreamId. See Get a StreamId.
- Optionally, deselect Include Audio. See Audio stream.
- Optionally, enter an ISO 8601-formatted datetime string in Playback Time to request video playback instead of live video.
- Optionally, select Skip Gaps to skip gaps between video sequences in video playback.
- Optionally, enter a number in Playback Speed. The default is 1.0, and any value > 0 and ≤ 32 is valid.
- Enter Username and Password of a basic user with access to the camera.
- Optionally, enter a STUN server address, for example
stun:stun1.l.google.com:19302. - Optionally, enter a TURN server address, username, and credential (password).
- Select signaling protocol. Default selection is REST, See Signaling protocols.
- Select Start to establish the connection.
Get a DeviceId
You can use the Management Client to get a CameraId:
- In the Site Navigation pane, select Servers and then select the recording server.
- Select a camera that support H.264 in the Overview pane.
- Select the Info tab in the Properties pane.
- Ctrl+Click the video image in the Preview
pane.
The camera ID will be displayed at the bottom of the Properties pane.
You can use the Management Client to get a
MicrophoneId:
- In the Site Navigation pane, select Servers and then select the recording server.
- Select a microphone.
- Select the Info tab in the Properties pane.
- Ctrl+Click the video image in the Preview
pane.
The microphone ID will be displayed at the bottom of the Properties pane.
Get a StreamId
Cameras may have multiple streams. You can specify a
StreamId to request a specific stream. If the connection is
initiated without a StreamId, the camera’s default stream
will be used.
If an invalid StreamId is specified, a WebRTC session
cannot be initiated, and the diagnostics log will display an error
message.
You can use the Management Client to get a StreamId:
- In the Site Navigation pane, select Servers and then select the recording server.
- Select the camera hardware in the Overview pane.
- Unfold the camera hardware and select the camera device.
- Select the Streams tab in the Properties pane.
- Ctrl+Click the video image in the Preview pane.
- Select the Stream XML button.
- A small XML document describing available streams will open in your default XML application.
- Use the value of a
<referenceid>element of an H.264 asStreamId.
Audio stream
The sample supports including audio in the WebRTC stream. It’s
configurable using Include Audio. It’s an optional
parameter. If not set, it defaults to true.
If DeviceId is camera ID, and
Include Audio is true, the audio stream from a related
microphone will be included in the WebRTC session. If you don’t want to
include audio from the related microphone, you must set
Include Audio to false.
If DeviceId is microphone ID,
Include Audio must be true; otherwise the WebRTC session
will fail to initiate.
NOTE: For playback, the audio stream in the sample is only available when playback speed is 1.0.
Signaling protocols
The following WebRTC signaling protocols are supported:
- REST
- WebSockets
RESTful signaling might be a bit slower as the client will have to poll for ICE Candidates from the API Gateway. WebSockets may have disadvantages in some network environments. In most WebRTC implementations, WebSockets is preferred.
Description
Following is the description of the two different ways of setup of the WebRTC connection.
Common
Both the RESTful and the WebSocket communication share several common
setup and methods which are located in the main.js.
Particularly the callback methods for the peer connection, commands,
login in and log out.
RESTful API
Please look at the rest.js code while reading the
following steps:
- In
initiateWebRTCSession(), the session is initiated by a POST request toAPI/REST/v1/WebRTC/Session.
The request body contains- the
deviceId, see Get a DeviceId resolution, currently not supported- optionally a
streamId, see Get a StreamId, - optionally an
includeAudio, - optionally a
PlaybackTimeNode, see Playback of recorded video, iceServerssee STUN and TURN server addresses,
- the
- The response contains the newly created
sessionIdand theofferSDPwhich is used to update theRTCPeerConnectionobjectpc. - An
answerSDPis created based onpc, and it is sent to the session by a PUT request toAPI/REST/v1/WebRTC/Session. - Next, ICE candidates will be exchanged in two methods:
addServerIceCandidates()polls the API Gateway server while the connection state isneworchecking, andSendIceCandidate()is called every timepcfinds an ICE candidate. - Once ICE candidates have been exchanged, WebRTC will try to establish a connection between the peers.
The bearer token expires (default after 1 hour). Code for getting and
refreshing the token can be found in tokenCommunication.js;
see the methods getToken and refreshToken.
For more information about the signaling involved in establishing a WebRTC connection, please refer to: WebRTC API, Signaling and video calling
Playback of recorded video
If a playback start time is provided, recorded video is streamed instead of live video. The API Gateway will start streaming at the requested time. If there’s no video recorded at that time and skip gaps is enabled, the stream will immediately forward to the first video sequence after the requested time.
Playback is controlled by including an optional
PlaybackTimeNode object when initiating the session.
PlaybackTimeNode is an object taking these values:
playbackTime, a datetime string in ISO 8601 format.
Example: the 10th of July 2020 at 3 PM UTC can be represented as2020-07-10T15:00:00.000Z(or2020-07-10T17:00:00.000+02:00).skipGaps, optional boolean. Iftrue, gaps between video sequences are skipped during playback; otherwise, no frames are streamed for the duration of the gap.speed, optional number. Sets the speed at which the video is played back. The default is 1.0, and any value > 0 and ≤ 32 is valid.
WebSocket API
Please look at websocket.js code while reading the
following:
- In the
startWebSocket(), a new websocket is opened and aregisterrequest is sent to the API Gateway. - Once the server responds the callback will send a
connectrequest. The request contains- the
peer, see Get a DeviceId resolution, currently not supported- optionally a
streamId, see Get a StreamId. - optionally an
includeAudio, - optionally a
playbackTime, a datetime string in ISO 8601 format. - optionally a
skipGaps, optional boolean. Iftrue, gaps between video sequences are skipped during playback; otherwise, no frames are streamed for the duration of the gap. - optionally a
playbackSpeed, optional number. Sets the speed at which the video is played back. The default is 1.0, and any value > 0 and ≤ 32 is valid. - optionally
iceServerssee STUN and TURN server addresses.
- the
- The response will contain
- the
session, the newly createdsessionId - optionally
iceServerssee STUN and TURN server addresses
- the
- After the response the server will send an
inviterequest to the client. The request contains:session, the currentsessionIdoffer, theofferSDPwhich is used to update theRTCPeerConnectionobjectpc.
- An
answerSDPis created based onpc, and is sent as a response through the WebSocket.
How to calculate time for current frame
- In
commonSetup()inmain.js,frameStartTimeis set to eitherDate.nowor the requested playback time.frameStartTimewill be considered the start of streaming.- A callback function is registered for the
<video>player. The function will be called next time a frame has been received. - The WebRTC session is initiated.
- In the callback function, the
rtpTimestampis extracted from WebRTC frame metadata.rtpTimestampis the time since streaming started in milliseconds.
To getframeDate(the date and time for the current frame), thertpTimestampvalue is added toframeStartTime. - The function is registered again to be called next time a frame has been received.
To register the callback function, the sample uses
requestVideoFrameCallback() (currently a W3C Draft
Community Group Report) for most browsers, and
requestAnimationFrame() for
FireFox:
- The
requestVideoFrameCallback()method registers a callback to run when a new video frame has been received. See HTMLVideoElement.requestVideoFrameCallback(). - The
requestAnimationFrame()method tells the browser to perform an animation and requests that the browser call a specified function to update an animation before the next repaint. See Window: requestAnimationFrame() method.
When there are gaps between video sequences:
- If
skipGapswasn’t enabled, no frames are streamed during gaps between video sequences. - If
skipGapswas enabled, frames from the next video sequence get streamed immediately as if no gap had occurred.
In any case, the rtpTimestamp for the next video
sequence jumps as if frames had been streamed during the gap.
STUN and TURN server addresses
To help establish a connection through NATs, WebRTC uses STUN (Session Traversal Utilities for NAT) and/or TURN (Traversal Using Relays around NAT) servers.
A STUN server is used to discover the public IP address and port number of a device behind a NAT.
A TURN server is used to relay traffic between peers when a direct connection is not possible due to firewall or NAT restrictions.
The sample supports specifying one of each in the user interface. More than one STUN and/or TURN server can be specified, but the sample only supports up to one of each.
The values passed on from the user interface are used in:
REST
start()method inrest.jswhere anRTCPeerConnectioninstance is created. This makes sure that the client uses the STUN and/or TURN servers passed on from the user interface when generating local ICE candidates.initiateWebRTCSession()method inrest.jswherebody.iceServersis populated. This sends the configuration to the API Gateway and makes sure that the API Gateway uses the STUN and/or TURN server defined in the user interface.
WebSocket
connectToCamera()method inwebsocket.jswhereparams.iceServersis populated. This send the configuration to the API Gateway and makes sure the API Gateway uses the STUN and/or TURN server defined in the user interface.
While it’s no longer necessary to send the configuration to the API
Gateway during signaling (in body.iceServers in
initiateWebRTCSession() method), setting
body.iceServers when creating a
RTCPeerConnection instance is still required.
Trickle ICE
The API Gateway fully supports trickle ICE, but the sample keeps checking on new candidates from the server only while the ICE gathering state is new or checking. Once the connection between peers has been established, the sample stops polling the API Gateway.
To support getting candidates from the server at any time during the connection, the API Gateway must be polled periodically during the whole duration of the connection.
WebRTC features in browsers
Each browser has different levels of support for WebRTC features. The sample makes use of the Adapter.js library which allows for improved browser compatibility when using WebRTC API.
PTZ commands
XProtect supports sending PTZ commands through a WebRTC data channel. The sample creates the data channel in the following line of code:
dataChannel = peerConnection.createDataChannel("commands", { protocol: "videoos-commands" });Later on, when a PTZ arrow in the sample user interface is selected, a PTZ command is sent by the following function:
async function command(command) {
    var ptzCommand = {
        jsonrpc : "2.0",
        type: "request",
        method: "ptzMove",
        params: { direction: command }
    };
    dataChannel.send(JSON.stringify(ptzCommand));
Limitations and workarounds
WebRTC connection on a local network uses mDNS
To prevent private IP addresses from leaking from a local network when running WebRTC applications, modern browsers by default send mDNS (multicast DNS) addresses as ICE Candidates to the signaling server.
API Gateway support for mDNS
The signaling server running in the API Gateway supports resolving mDNS addresses when running on a Windows version with native support for mDNS. Native support for mDNS was introduced in Windows version 1809 (October 2018) or later, and is available in any recently updated Windows Server 2019 or Windows 10 installations, and all Windows Server 2022 and Windows 11 installations.
WebRTC connections across routers in a local network
mDNS relies on multicast which by default will not pass through routers. This means that in enterprise environments, mDNS will fail in many cases:
- mDNS over wired Ethernet works on the same local network segment, but in more complex network solution (most enterprise environments), mDNS will fail.
- mDNS over WiFi will only work on simple network configurations (as for wired networks). In configurations with WiFi extender or Mesh networks, mDNS will likely fail.
The signaling server running in the API Gateway supports a workaround
for connections across routers on a local network. The signaling server
will attempt to get the client’s local IP network address from
X-Forwarded-For and Remote_Addr headers in the
HTTP request and use that to add an ICE Candidate with higher priority
than the ICE Candidate with the mDNS address. This will not work in all
cases; on some networks, X-Forwarded-For is removed and
Remote_Addr will not contain the local IP address of
client.
Disable browser mDNS support
As a last resort, you can try disabling browser mDNS support to force the browser to reveal the local IP network address in WebRTC connections.
In Chromium-based browsers, mDNS support can be disabled by opening
chrome://flags or edge://flags and setting
Anonymize local IPs exposed by WebRTC to
Disabled.
Troubleshooting tips
CORS errors
Symptoms
Sample Diagnostics log messages: “Failed to retrieve token”, “Failed to initiate WebRTC session”.
Browser Developer tools Console shows CORS errors:
Access to fetch at 'http://test-01/API/IDP/connect/token' from origin 'http://localhost' has been blocked by CORS policy: . . .
Access to fetch at 'http://test-01/API/rest/v1/WebRTC/Session' from origin 'http://localhost' has been blocked by CORS policy: . . .
Cause
The sample is not served from same host server URL as the API Gateway, and CORS support has not been enabled.
Remedy
Enable CORS support as described in API Gateway CORS settings.
Cause
Errors are sometimes presented in the browser as CORS errors without being actual CORS issues. If you see a CORS error message in the browser, it could be related to configuration issues in the IIS.
Remedy
Open your browser Developer tools and select the Network tab. If it is not an CORS error, the actual error will be shown here in the messages received before the CORS error.
Cause
Your servers are using self-signed certificates and you are using a version of Firefox before version 120. Firefox before version 120 did not use the operating system’s certificate store and won’t know about the root certificate you have added to trust the self-signed certificates. Under some circumstances, this might result in CORS errors.
Remedy
The easiest work-around is to add the API Gateway and IDP server addresses to the list of sites that Firefox accepts even though their certificates can’t be verified.
- In the Firefox application menu, select Settings.
- Find the Privacy & Security | Security | Certificates section.
- Select View Certificates….
- In the Certificates Manager dialog, select the Servers tab.
- Select Add Exception…
- In the Add Security Exception dialog, add the server URL and select Get Certificate.
- If the untrusted certificate can be retrieved, you can now select Confirm Security Exception to allow this certificate.
For example:
- API Gateway:
https://host.domain/API - IDP:
https://host.domain/IDP
In this example, add https://host.domain.
If your IDP server is hosted at another URL, make sure to add this as well:
- API Gateway:
host1.domain/API - IDP:
host2.domain/IDP
In this example both host1.domain/API and
host2.domain/IDP need to be added to the exceptions.
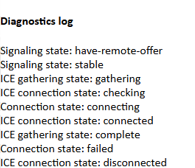
No connection through a symmetric NAT firewall
Symptoms
- Sample Diagnostics log show progress but eventually fails with “ICE connection state: disconnected”.
Cause
WebRTC cannot create a connection through a symmetric NAT firewall without using a TURN (Traversal Using Relays around NAT) server. Without using a TURN server, a WebRTC connection is possible only within the symmetric NAT firewall, that is, both your browser and the API Gateway must be behind the firewall.
Check with your system administrator if you are behind a symmetric NAT firewall, or run the test described here: Am I behind a Symmetric NAT?.
Remedy
Specify a TURN server.
See STUN and TURN server addresses.
Server errors
Symptoms
- Sample Diagnostic log messages: “Failed to retrieve token - SyntaxError: Unexpected token ‘<’”, “Failed to initiate WebRTC session - SyntaxError: Unexpected token ‘<’”.
- Browser Developer tools Network shows error status
502 Bad Gatewayor503 Service Unavailable. - Error events in the Windows Application log and IIS request log.
Cause
Syntax errors in the appsettings configuration files will prevent the API Gateway from starting.
Remedy
Do not edit
appsettings.jsonmanually. This file is created by the product installer and maintained by the Server Configurator.
Open and edit appsettings.production.json in a
validating editor. For more information, see Configuration.
IIS crashes
Symptoms
- IIS crash with only very general error information.
Remedy
Try temporarily enabling 32-Bit Applications in the IIS application
pool VideoOS ApiGateway AppPool. If WebRTC is the cause of
the crash, enabling 32-Bit Applications may provide you with more
detailed error information.
No video shown
Symptoms
- A connection is established, but no video is shown.
Cause
The video stream is not H.264. The API Gateway supports only H.264.
Remedy
Change the camera’s codec to H.264 or use a camera that supports H.264.
Cause
The requested playback time is more than 24 days before the start of the recorded video. This causes an integer wraparound in the WebRTC code.
Remedy
Use a playback time closer than 24 days to the start of recorded video.
Connection is closed right after it is established
Symptoms
- ICE connection state changes to ‘connected’ but connection goes
directly to state ‘failed’
Cause
Running WebRTC through Chrome (or other WebKit-based browsers) with a version of XProtect older than 2024 R1 will result in the symptom described above. A security update was released for WebKit browsers that requires an improved security connection. As a result, these browsers will fail any WebRTC connection to XProtect versions earlier than 2024 R1 or 2023 R3 with the applied security patch.
Remedy
Upgrade to XProtect 2024 R1 or if running 2023 R3, apply hotfix. Read Milestone KB Article for more information.
The sample demonstrates
- The signaling required to set up a WebRTC connection with an XProtect VMS
- Using an OAuth2 bearer token to authenticate WebRTC signaling and media streaming
- Sending PTZ commands through WebRTC datachannel
Using
- A simple WebRTC client based on RTCPeerConnection
- A RESTful API for WebRTC signaling with an XProtect API Gateway