3rd Party Driver Test Tool guide
Introduction
Drivers developed using the MIP SDK Driver Framework, also known as 3rd-party drivers, must be verified by Milestone before they can be listed on the Milestone Technology Partner Finder.
The 3rd Party Driver Test Tool simplifies development and verification of MIP Driver Framework-based drivers:
-
The tool helps partners during driver development by providing feedback about the state of their driver.
-
The tool assists the Milestone verification team in the driver verification process.
This tool is not a replacement for testing with Milestone XProtect® VMS. Rather, it provides an overview of the implemented functionalities, and attempts to detect inconsistencies and erroneous behaviour by analyzing the driver and running tests with connected devices.
The tool is part of the Milestone SDKTools package which is available from the Download software page.
Overview
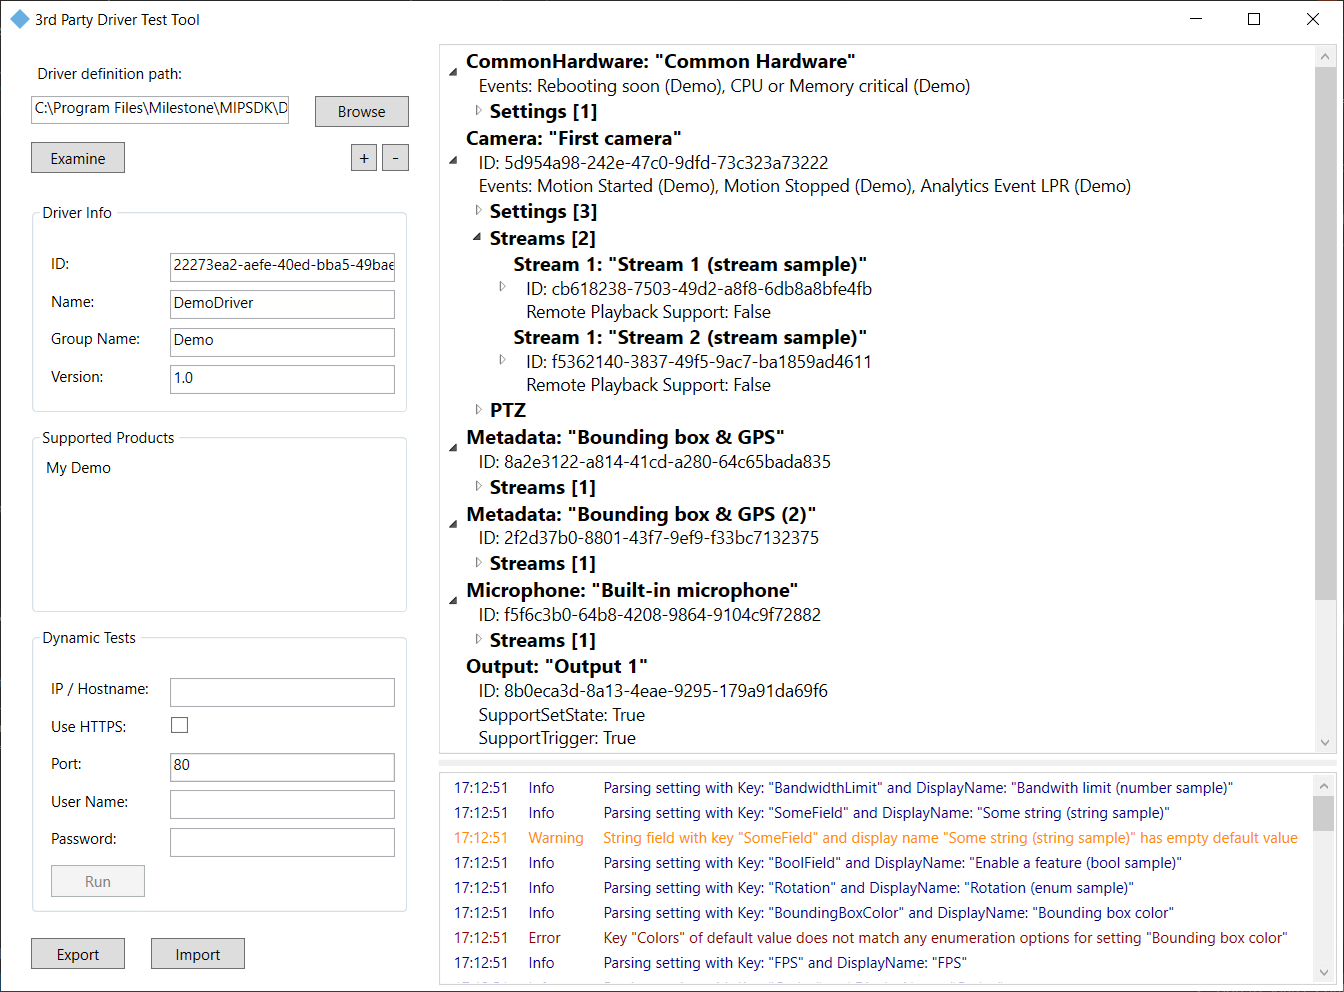
The 3rd Party Driver Test Tool user interface consists of these sections and controls:

| Section/control | Description |
|---|---|
| Driver definition path | Enter the path to the driver .def file or click Browse to select a driver .def file. |
| Examine | Click Examine to load and analyze the selected driver. |
| Driver Info | Displays ID, Name, Group Name and Version as defined in the loaded driver. |
| Supported Products | Displays the list of supported hardware products as defined in the loaded driver. |
| Dynamic Tests | Fill in connection info and credentials for a device that is online and reachable. |
| Run | Click Run to execute tests. Results appear in the Driver Overview and Logs sections. |
| Driver Overview | Displays all device definitions found in the loaded driver. Each device is listed in a tree structure containing its settings, events, and capabilities. |
| The Common Hardware node is generated by the tool and displays all settings and events that are defined at the hardware level. | |
| + and - | Use + (Expand All) or - (Collapse All) for fast control of the whole tree view. |
| Logs | Displays logs generated during loading the driver and running the dynamic tests. |
| Export | Click Export to save the information available at export time in a report file. |
| Import | Click Import to import and visualize an existing report file. |
Testing a driver
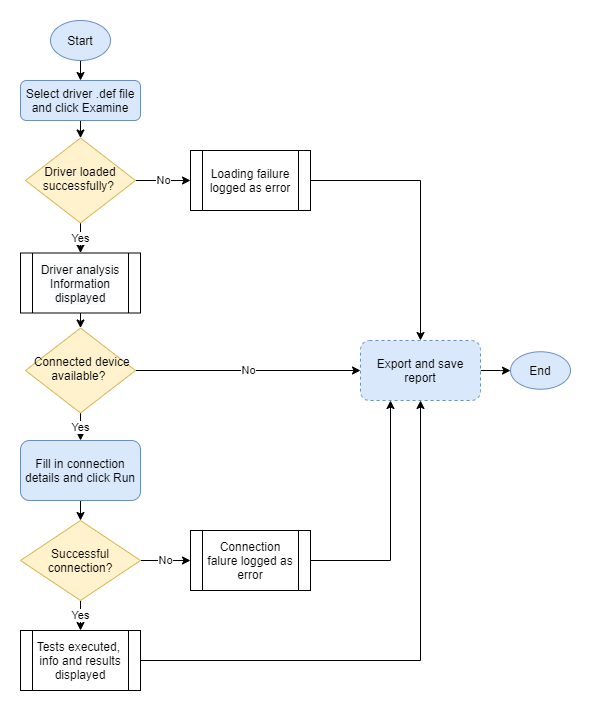
The driver test workflow consists of these steps:

-
Start the 3rd Party Driver Test Tool
-
Select a driver, and load and analyze the driver device definitions.
-
Run dynamic tests of driver functionalities with a connected device.
-
Export the gathered information and logs into a report file.
Starting the 3rd Party Driver Test Tool
By default, the tool is located in the folder C:\Program Files\Milestone\MIPSDK\Tools\3rdPartyDriverTestTool.
To start the tool, double-click 3rdPartyDriverTestTool.exe or run C:\Program Files\Milestone\MIPSDK\Tools\3rdPartyDriverTestTool\3rdPartyDriverTestTool.exe.
Loading and static analysis of the driver
The tool does not load the driver .dll directly. Instead it uses the .def XML file that specifies the name of the driver .dll to locate it, in the same way the XProtect VMS does.
After selecting the driver .def file, click Examine to initiate driver loading and analysis.
The tool performs several sanity checks on both the .def file and the .dll file. The driver load and analysis may fail due to different reasons, such as:
-
Malformed
.deffile -
Inability to locate or load the
.dll -
The driver does not meet minimum mandatory requirements, e.g.
ConfigurationManagerorConnectionManagernot implemented, etc.
After the driver has been loaded successfully, the tool fills in the Driver Info and Supported Products sections, as well as the Logs section.
Any inconsistencies found during the analysis phase are logged as either Warnings or Errors, depending on their severity.
Driver Overview section
Each Driver Device tree in the Driver Overview section is a direct representation of a single DeviceDefinition instance in the driver. The structure depends on the device type and defined capabilities.
Here is a formal description of the structure of each Driver Device tree as seen in the tool:
DeviceType : "Device Name"
- ID: Device GUID
- Events: List of defined events
- Settings [Number of Settings]
- List of <Setting Definition>
- Streams [Number of Streams]
- List of <Stream Definition>
- <PTZ>
- <Output>
<Stream Definition>:
- ID: Stream GUID
- Remote Playback Support: True|False
- Settings [Number of Settings]
- List of <Setting Definition>
- Metadata Support [Number of Metadata Support Definitions]
- List of <Metadata Support Definition>
<Metadata Support Definition>:
- MetadataType: "Metadata Name"
- Valid Time
- Settings [Number of Settings]
- List of <Setting Definition>
<Setting Definition>:
- Setting Name [Bool|String|Int|Double|Enum]
- Default Value
- Initial Value
- Values: List of Enum values
- Min Value (Int, Double)
- Max Value (Int, Double)
- Resolution (Int, Double)
<PTZ>:
- General
- Center: True|False
- Diagonal: True|False
- Home: True|False
- Rectangle: True|False
- Pan/Тilt/Zoom:
- Absolute: True|False
- Relative: True|False
- Start: True|False
- Stop: True|False
- Automatic: True|False
- Presets
- Load from Device: True|False
- Set preset: True|False
- Speed: True|False
- Query Absolute Position: True|False
- Absolute Speed: True|False
<Output>:
- SupportSetState: True|False
- SetTrigger: True|False
The tree view only shows the events from the device definitions in the driver. If the driver uses built-in events provided by MIP SDK Driver Framework without explicitly defining them, they do not appear in the tree. Such events are
InputActivated,InputDeactivated,OutputActivated,OutputDeactivated, etc.
Dynamic tests
To run dynamic tests with the loaded driver, the tool needs to connect to a supported hardware product.
Each functionality in the driver, e.g. Streaming or PTZ, is implemented in the driver via a separate Manager class that provides API methods for working with that functionality. The goal of the dynamic tests is to check whether functionalities are implemented in the driver, and whether they work as expected.
-
Example: The loaded driver has an Output device that supports Trigger Output (
SetTriggerflag is set toTrue) but calling theTriggerOutputmethod fails and throws an exception. The tool detects this as an unexpected behaviour and sets an appropriate result. -
Example: The loaded driver's Camera device reports PTZ capability, but for some reason the
PtzManageris null. The tool detects this as unexpected and sets the appropriate results.
The tool executes different sets of tests for each device type. Each test verifies a single API method of the corresponding Manager class.
- Example: The loaded driver has an
Outputdevice. The tool executes a test for each API method of theOutputManagerclass:IsActivated,ActivateOutput,DeactivateOutput,TriggerOutput
For better visibility of unintentional omission, the tool lists all tests that are relevant to a Manager class dealing with a device/capability.
- Example: The loaded driver has a
Cameradevice withRemotePlaybackflag set toFalsefor all of its streams. The tool lists all possible Playback tests but does not execute them.
Running the tests
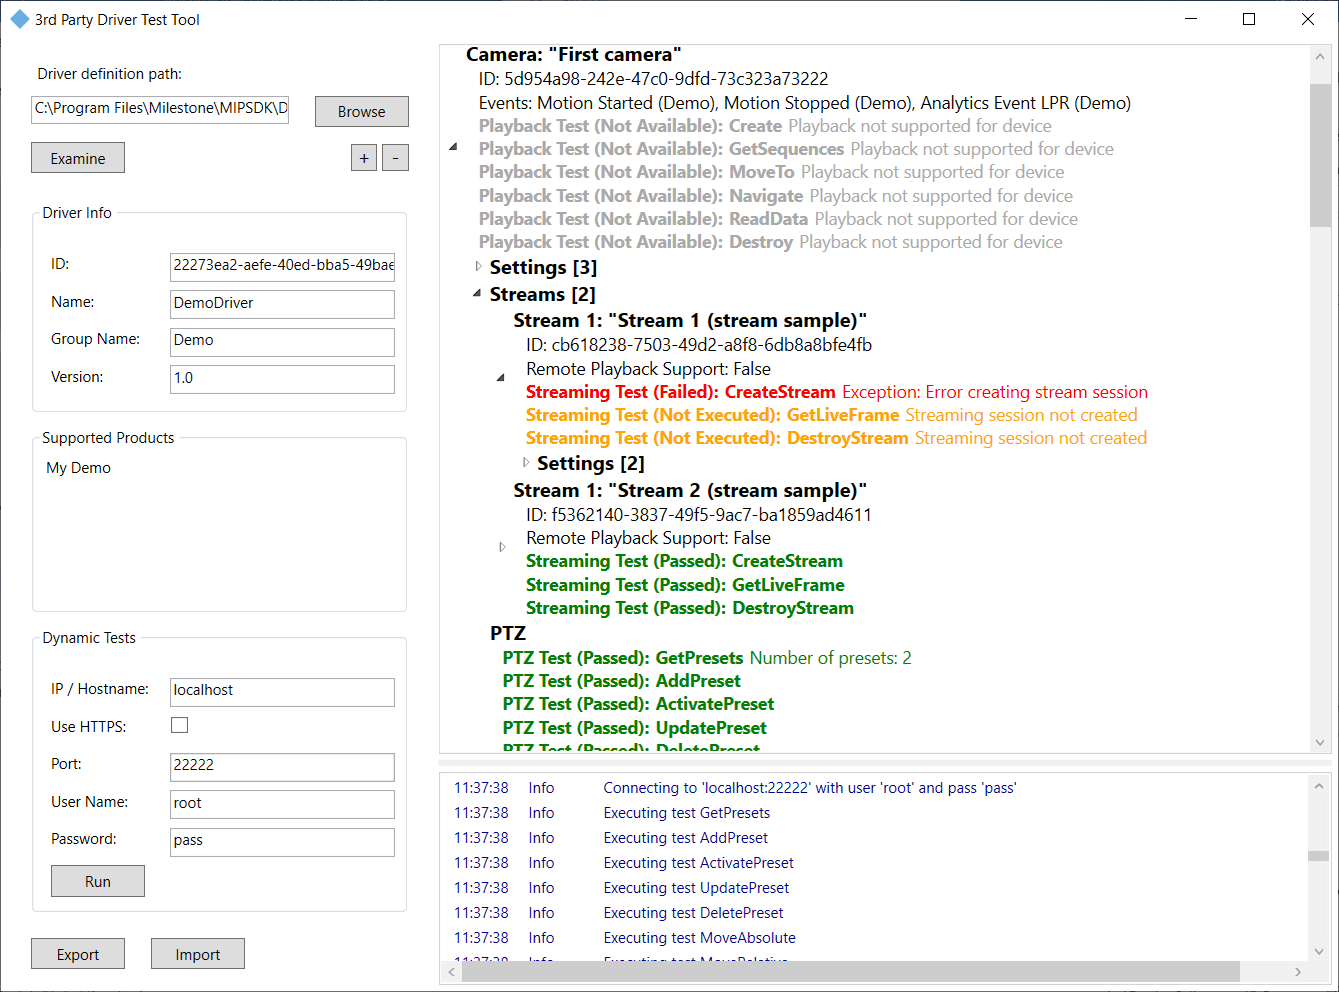
To start the tests, fill in valid connection info (IP/Hostname, Port) and credentials (User Name, Password) for the connected device in the Dynamic Tests section and click Run.
Test info and results
The tool displays the test info lines directly below the tested device/capability in the Driver Overview section.

Each test info line has the following format: TestType (Result): TestName AdditionalInfo
- TestType - Based on the Manager class
- Result - Outcome of the test
- TestName - API method
- AdditionalInfo - Information relevant to the Result
There are four types of test results:
-
Passed - No exceptions have been thrown and the result (if any) returned by the method is valid.
-
Failed - An exception has been thrown, a method returned an invalid result, connection has been lost, or a required method has not been implemented in the driver.
-
Not Available - The functionality verified by the test is not enabled. The tool does not execute the test, but shows that the test is applicable for the device/capability under different circumstances.
-
Not Executed - The tool does not execute the test because some prerequisites are missing. E.g. a previous test has failed, and the current test depends on its successful passing or return value.
If the initial connection to the device fails, the tool does not attempt to execute the tests. Instead, it logs an Error with the reason for the failed connection. The Error log is based on the information returned by the driver, e.g. authentication error.
The Dynamic tests do not cover Event and Input polling functionalities.
Exporting generated reports
After each major step - loading the driver, executing the dynamic tests - you can click Export to generate and export a test report.
The report is saved as a .json file that contains the full information available at export time:
-
Device Info section
-
Supported Products section
-
Driver Overview section
-
Dynamic Tests section
-
Logs section
In addition, the report contains the version of the tool with which it is created.
Reports are an easy way to keep snapshots of the state of the driver during development, and for reference at a later point in time.
They are also used in Milestone's driver verification process.
Reviewing existing reports

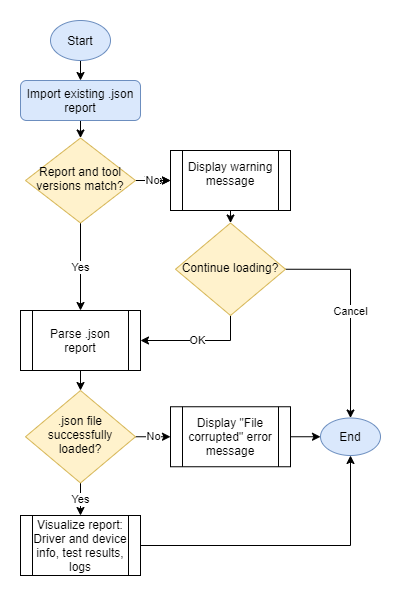
Click Import to select and open a .json report file.
On successful import, the tool visualizes the report data identically to a just loaded driver, with or without dynamic test execution information, along with all saved logs.
The imported report is read-only and cannot be modified or exported.
If the report was created with a newer or older version of the 3rd Party Driver Test Tool, a warning message appears on Import. You may choose whether to continue loading the report or cancel.
- "This file was exported by a different version of this tool (<report_version>). The current version is <tool_version>. There may be missing or misleading information shown. Continue?"
In case of a corrupted report file, the tool stops loading the report and issues an error:
- "File is corrupted!"